Quick Reference
This page includes reference material with sections that cover all of the
operators, functions, and methods
you'll need in this class, as well as sections specific to the
turtle, wavesynth, and
optimism modules, and a section on other built-in modules
we'll use. You can think of it like a pocket dictionary for
the parts of the Python programming language that we'll cover in this
class.
We recommend using the "find" feature of your browser to quickly jump to the function or concept you're looking for.
Operators
Right from the start of the class, we will be dealing with operators in Python, which work somewhat like the same operators you're familiar with from math, like '+' for addition, although while their use in mathematical formulae indicates some kind of relationship between values, in Python, they correspond to simplification steps for the computer to carry out. Python also deals with more than just numbers, and the same operator can have different behavior depending on the types of its operands.
The table below includes very brief reference explanations for every operator that we'll use in this class, along with tiny examples of how they can be used correctly (feel free to paste those examples into your Python shell to see what the results are and double-check your understanding).
| Math Operators | Operator | Effect | Example(s) |
|---|---|---|
+
|
Adds the left- and right-hand numbers together, resulting in a number, or concatenates the left- and right-hand strings, resulting in a string. Can also be used to concatenate lists or tuples. If either operand is a floating point number, the result will be a floating-point number, but if they're both integers the result will be an integer. |
1 + 2.5 "abc" + "def"
|
-
|
Subtracts the right-hand number from the left-hand number, resulting in a number. Like +, the type of the result (int or float) depends on the types of the operands. - Can also be used as a unary operator to construct a negative value. Note that - is much less flexible than + as it cannot be used with strings or other sequences.
|
2 - 1 -4.5
|
*
|
Multiplies the left- and right-hand numbers together, or creates a longer string by repeating the left-hand string the right-hand integer number of times. When used with a string, the right-hand value must be an integer. |
3 * 4 'ha' * 3
|
/
|
Divides the left-hand number by the right-hand number. The result will always be a floating-point number, even if the two numbers divide evenly. Attempting to divide by 0 causes a ZeroDivisionError.
|
12 / 3 0.5/0.2
|
//
|
Divides the left-hand number by the right-hand number, and then rounds towards negative infinity to produce an integer result. Attempting to divide by zero is still an error. |
12 // 3 999 // 1000 -12 // 5
|
%
|
Computes the modulus of the left-hand number by the right-hand number. For positive numbers, this is the same as the remainder after division. For negative numbers, it's different. The modulus will always have the same sign as the right-hand number, unless the result is 0 (which it is for all multiples of the right-hand number). |
5 % 3 -4 % 5 -4 % -5
|
**
|
Raises the left-hand number to the right-hand exponent. Result is a floating-point number if either operand is one, but is an integer if both operands are integers. |
3 ** 2 3 ** 0.0 5 ** -1
|
Comparators | Operator | Effect | Example(s) |
| Note |
Two comparators can be chained together and the result will be True only if both comparisons succeed. For example 1 <= x < 5 will be true if the value of the variable x is greater than or equal to 1 and also strictly less than 5.
|
|
==
|
Read as 'equals', this comparator results in True when its left- and right-hand sides are the same as each other. Note that with floating-point numbers, two numbers that should be the same may exhibit different rounding errors.
|
1 == 1 "abc" == 'abc' 1.0 == 1 (5 * 1.0) / 2.54 == 5 * (1.0 / 2.54)
|
!=
|
Read as 'not equals', this comparator results in True when its left- and right-hand sides are not the same as each other. Any kind of values may be compared.
|
1 != 3 'abc' != 123 1.4 != 1.4
|
< / <=
|
True when the left-hand number is smaller than the right-hand number, or when the left-hand sequence (e.g., string or list) would come before the right-hand sequence in sorted order (i.e., dictionary order for strings). The <= form is additionally True when == would be True.
|
0 < 1 'aardvark' < 'aardvarl'
|
> / >=
|
The inverses of < and <= these are True when their left-hand value is greater than their right-hand value, either numerically or based on ordering. >= is also true when the two sides are the same (based on ==).
|
15 > -15 [3, 1] > [2, 10]
|
is / is not
|
True when the objects on the left and right hand side are the same object, whether or not they have the same structure (which == can check). Use this to distinguish between aliasing and cloning situations. Should usually only be used with None and with mutable types like lists and dictionaries, since results are interesting for immutable types like numbers and strings. The is not form just returns the opposite result.
|
x is None `
|
Logical Operators | Operator | Effect | Example(s) |
| Note |
Logical operators treat their operands as boolean values even when they aren't. For numbers, any value other than 0 is treated as True, and exactly 0 is treated as False. For strings and other sequences, any non-empty sequence is treated as True, and any empty sequence is treated as False. We call these other values "truthy" or "falsey" respectively, although it's generally better to use a comparison operator or predicate to create a real boolean value yourself. The bool function can be used to explicitly convert a value to a boolean, e.g., bool(4).
|
|
and
|
True if both the left- and right-hand values are truthy. and happens **after** or, just like + happens after *. When used with non-boolean values, the result is actually the right-hand value if both are truthy, or the first value that isn't truthy if one of them isn't, but relying on this behavior is bad style.
|
True and True x > 3 and x % 2 == 0
|
or
|
True if either the left- or right-hand values are truthy. or happens **before** and, just like * happens before +. When used with non-boolean values, the result is actually the left-hand value if it is truthy, or the right-hand value if the left-hand value isn't truthy (regardless of whether or not the right-hand value is truthy), but relying on this behavior is bad style.
|
False or True x < 'd' or x > 's' w and (x or y) and z
|
not
|
Reverses a boolean value, turning True into False and vice versa. For non-boolean values, the value is first converted to a boolean and the reversed, so the result is always a boolean. Applies **before** both and and or, just like a - sign for a negative number applies before + and *.
|
not (1 <= x <= 3) not False or True not (False or True)
|
Special Operators | Operator | Effect | Example(s) |
in / not in
|
Checks whether the left-hand operator is part of the right-hand sequence. If they are both strings, this will be True if the left-hand string can be found as a contiguous sub-string of the right-hand string. If the right-hand-side is a list, it will be True if the left-hand-side value is == to one of the elements of that list. If the right-hand side is a dictionary, it will be True if the left-hand is == to one of the keys of the dictionary (values are ignored). The not in variant just returns the opposite result.
|
'ab' in 'abc' 'ab' in 'acb' 'ab' in ['a', 'b', 'c'] [1, 2] in [[1, 2], [3, 4]]
|
.
|
This is not really an operator, but it's used followed by a name to retrieve an associated or bound value, often a function. For example, after importing a module, use . to extract and use functions or values from that module. Or use it to refer to build-in methods of common types like strings.
|
'a-b-c'.split('-') '-'.join(['a', 'b', 'c'])
|
[]
|
Not really an operator, but used to access an individual item from a collection (this is called "subscripting"). For lists, tuples, and strings, the value inside the brackets must be an integer, and it will be used as an index to pull out a single item from the sequence. For dictionaries, the value inside the brackets must be a key, and the result will be the associated value. In both cases, an invalid index (e.g., past the end of the sequence) or key (e.g., a key that's not in the dictionary) will result in an error. For sequences, zero is the first element, and negative indices count backwards from the end. |
'abc'[1] 'last'[-1] |
[:]
|
When square brackets have a colon inside, the result is a slice instead of a subscript. Slices are used to pull out multiple items from a sequence, so the result will be a sequence of the same type as the sequence that was sliced. There can be one or two colons, and thus two or three values specified, but missing values will be filled with defaults. The first value specifies the start of the slice, the second specifies the end, and the third (if present) specifies the step value. The resulting sequence will start within the base sequence at the given start index (default is the beginning of the sequence), include all items whose indices are that index plus multiples of the step value (default is 1 meaning every item), and it will stop before the given end index (default is the end of the sequence). With a negative step value, the order will be reversed, and the start index must be after the end index (in this case, the default start and end are swapped). Slicing only works with ordered sequences (e.g., strings, lists, and tuples), not with dictionaries or sets. |
'abcd'[1:3] 'abcd'[::2] 'abcd'[::-1]
|
Built-in Functions
Besides operators, some of the most important
building-blocks of Python programs are built-in functions. These
represent important ways to convert or deduce information and a few of
them, like print are going to appear in almost every program
you write.
To use a function, we write the function name followed by parentheses. Any information that the function needs to work with is placed in the parentheses, separated by commas, these expressions are called the arguments of the function. This notation overall is called a "function call" and it looks like this:
len("hello")In this example we've used the len function with "hello" as
the argument, and the result will be the integer 5. When used as part
of a larger program, if the function has a result (which most do) then
we'd usually store that result in a variable, like this:
myString = "What a lovely day!"
howLong = len(myString)
Here we also used a variable as the input, rather than a fixed value. You could also use a function as part of a larger expression: the place where you write the function call will eventually be simplified to the result value from that function call. Here's an example of a program that uses several built-in functions:
x = 5
y = 4
z = 10

print(max(x, y, z) + min(x, y, z))
The last expression simplifies as follows:
print(max(x, y, z) + min(x, y, z))
print(max(5, y, z) + min(x, y, z)) # variable substitution for x
print(max(5, 4, z) + min(x, y, z)) # variable substitution for y
print(max(5, 4, 10) + min(x, y, z)) # variable substitution for z
print(10 + min(x, y, z)) # max function result
print(10 + min(5, y, z)) # variable substitution for x
print(10 + min(5, 4, z)) # variable substitution for y
print(10 + min(5, 4, 10)) # variable substitution for z
print(10 + 4) # min function result
print(14) # + operator
None # print function result; this result won't show up
Note that as a side effect of this simplification, the text "14" will be printed.
The table below includes brief explanations for the built-in functions
that we'll use in this class, along with tiny examples of how they can be
used correctly (feel free to paste those examples into your Python shell
to see what the results are and double-check your understanding).
Remember you can always use the help function to get more
information about another function.
| Help Functions | Function | Effect | Example(s) |
|---|---|---|
help
|
This function is designed to accept another function as an argument, although you can also give it a string and it will tell you about the thing that you named. It brings up documentation for whatever function you give it, or if you call it without an argument, it starts an interactive help system. Use it to quickly remind yourself of how a particular function works. |
help() help(len) help('len')
|
dir
|
Returns a list of strings showing all of the attributes that a particular value (or type) has available. These attributes include any methods the value might have, which are functions that can be called using that value with a '.' after it, e.g., 'ABC'.lower(). You can use this to help remind you what's possible with a particular type of object, like a string or a list.
|
dir(str) |
Input/Output Functions | Function | Effect | Example(s) |
print
|
Displays text in the program output area. If we were to publish our programs for non-programmers to use, they would only see what the program prints. Conversely, printed values are just displayed as text, they do not become a string value that Python can use for further computation. print is a special function that accepts any number of arguments. With zero arguments, it just prints a blank line. With one or more arguments, it converts each argument to a string, and then displays each of those strings, with a space in between. Advanced: you can use the sep= keyword argument to control what gets printed in between, and the end= keyword argument to control what gets printed at the end (default is a new line character which is why each print call displays text on a new line).
|
print(1, 2.0, 'three') print(1, 2, 3, sep='-') |
input
|
Displays a prompt (just like print displays text) and then waits for whoever is running the program to type in some text, which becomes the result of the input call within Python. This allows us to have interactive programs that respond to the user's input. Since the function has a result (a string) you'll want to store that result in a variable. You might also want to convert it from a string to some other type, for example if you're asking for a number. Note: leaving a space at the end of your prompt helps ensure that the user won't type a space at the start of their input.
|
name = input('What is your name? ') fav = float(input('What's your favorite number? '))
|
Numerical Functions | Function | Effect | Example(s) |
max
|
Returns the largest from among the values it was given as arguments, or if there's just one argument and it's a sequence, returns the largest value in that sequence. When dealing with strings, alphabetic ordering is used to determine the 'largest' value. |
larger = max(x, y) last = max('Zebra', 'Aardvark') largest = max([123, 12, 1234])
|
min
|
Works just like max, except it returns the smallest value instead of the largest one.
|
smaller = min(x, y) first = min('Zebra', 'Aardvark') smallest = min([123, 12, 1234])
|
round
|
Returns a rounded-off version of the number you give it. With just one argument, it will return the nearest integer. With two, the second argument is an integer that specifies how many decimal places to round to (and the result will always be a floating-point number). |
show = round(x, 2)
|
math.ceil
|
Returns the smallest integer that's greater than or equal to the number you give it. You'll need to include the line import math to use this function. Whereas round rounds to the nearest integer and int chops off the decimal part, math.ceil always rounds up.
|
four = math.ceil(3.01)
|
math.floor
|
Works like math.ceil but rounds down (towards negative infinity) instead of up. Note that for positive numbers, int does the same thing, but for negative numbers, they're different.
|
four = math.floor(4.99)
|
Type Functions | Function | Effect | Example(s) |
| Note |
The type conversion functions do not change the value of a variable. Instead, you give them one value, and they give back a converted value as a result. So for example, you would write code like number = int('123') to capture the result of the type conversion function and store it in a new variable.
|
|
int
|
Converts to an integer. Can accept floating-point numbers (chops off the decimal part; does not round) or strings that are composed of just digits, like '123'. Special strings 'inf', '-inf', and 'NaN' represent special numbers.
|
num = int('-32') ∞ = float('inf')
|
float
|
Converts to a floating-point number. Works on integers as well as strings that represent floating-point numbers. Accepts scientific notation in strings using the letter 'e' to stand for 'times 10 to the...'. |
fl = float(3) fl = float('1.2e-3')
|
str
|
Converts to a string. Works on literally every kind of Python value, up to and including other functions. |
text = str(123)
|
repr
|
Converts to a string, and that string will match what you'd type in Python to get the same value. So for example, str('hello') is just the string 'hello', but repr('hello') includes the quotation marks you'd need to type in Python to represent that string: "'hello'". Helpful when you're debugging and want to see what a value is, since printing the number 123 vs. the string '123' will show the same thing, but if you use repr you can tell them apart.
|
desc = repr('Hello')
|
list
|
Converts to a list. Works on any kind of sequence, including existing lists, and always creates a new list, so you can use it to copy a list as well as converting. When used on a string, the individual characters become the entries of the resulting list. If no argument is given, an empty list is created, but you could also just write [].
|
vowels = list('aeiou') empty = list()
|
tuple
|
Converts to a tuple. Works on any kind of sequence, just like list, and can also create an empty tuple if not given an argument (but you could just write ()).
|
fixed = tuple([1, 2, 3])
|
dict
|
Converts to a dictionary. Requires a sequence of 2-element sequences as input, so it's usually not that useful. Can be used without an argument to create an empty dictionary, but you could also just write {}.
|
points = dict([('a', 3), ('b', 1)])
|
set
|
Converts to a set. Accepts any sequence, although each element of that sequence has to be "hashable," i.e., immutable. Can also be used without an argument to create an empty set (and there's no other way to do so). Note that because of the nature of a set, duplicate items from the sequence will be dropped, and ordering is ignored. |
unique = set([1, 2, 3, 2, 4]) letrs = set('letters')
|
type
|
Not a type conversion function, but tells you the type of a value. It will return one of the type conversion functions above as a result (actually, they're something called a "class", but we won't discuss the difference in this course). |
type(3) type(len)
|
Identity Functions | Function | Effect | Example(s) |
id
|
Returns the "identity" integer for any value. Two different values will hae different identities, even if they are equivalent. This means that you can use id to distinguish between cloning and aliasing situations.
|
id(3) id('word') |
hash
|
Returns a "hash" integer for any hashable value. You'll get an exception if you give it a non-hashable value, like a list, dictionary, or set. The hash integer for identical values is always the same, and it's unlikely that two different values will have the same hash. |
hash(3) hash("word")
|
Sequence Functions | Function | Effect | Example(s) |
len
|
Measures the length of the sequence you give it, returning an integer. For empty sequences, this will be zero. For a list or tuple, this counts the number of entries, for a string, it counts the number of characters, and for a dictionary, it counts the number of key/value pairs. |
length = len('abc')
|
range
|
Creates a special range sequence that holds an arithmetic sequence of numbers. The sequence has a start and a stop, and changes by a certain step value in between. For example, the numbers 2, 4, 6, 8 start at 2, stop before 9 (or 10), and step by 2 each time. If only one argument is provided, the start will be 0, the step will be 1, and the argument will be used as the stop (range never includes the stop value itself, but stops just before it gets there). If two arguments are provided, they will be the start and stop and the step will be 1. If three arguments are provided, they will be the start, stop, and step in that order. Note that if you provide a negative step value, you'll have to make sure that the start value is larger than the stop value, or an empty range will result. Note: use this with len to get a range that includes all of the indices of another sequence.
|
evens = range(2, 10, 2) odds = range(9, -1, -1) indices = range(len([10, 20, 30]))
|
enumerate
|
Creates a special sequence that holds tuples containing elements from a base sequence preceded by their indices in that sequence. For example, enumerate('abc') would yield the tuples (0, 'a'), (1, 'b'), and (2, 'c'). This can be used along with unpacking as an alternative to using range with len by writing for index, value in stuff: ...
|
|
reversed
|
Returns a special reversed object that represents the items from another sequence in reverse order. You can use a for loop to directly iterate over this special sequence, or if you want to do more with it, convert it to some other kind of sequence like a list.
|
countdown = reversed([1, 2, 3]) |
sorted
|
Works like .sort (see there for details), but applies to any sequence, and you give the sequence as a parameter instead of using the .sort method like you would with a list. Always returns a list, no matter what kind of sequence you give it.
|
sorted('defabc') sorted((1, 3, 2)) sorted(['xy', 'm', 'abc'], key=len)
|
File Functions | Function | Effect | Example(s) |
open
|
Opens a file and returns a file manager object that can be used to read from or write to that file, depending on the mode specified. The first argument is a string that specifies the file name (possibly including directory information) and the second argument is a string that specifies the mode to use. 'r' is read mode and lets you use the various reading methods like .read, 'w' is write mode and lets you use .write, but also erases the file. 'a' is append mode, and lets you use .write to write more at the end of a file, without erasing it like write mode does. The result of open can (and should) be used in a with statement so that .close will be called automatically. If not, then the .close method of the file manager needs to be called in order to finalize any edits made to the file.
|
|
Common Methods
In addition to Python's built-in functions, Python's basic types like strings, lists, and dictionaries have more functions attached to them as "methods" that you'll need to learn about. A "method" is just a function that's attached to a type; to call it we write a specific value of that type (maybe as a variable) and then a period, followed by the method name and any additional arguments. The value before the period always serves as an implicit first argument to the method call. This is what that looks like:
response = input("Do you like ice cream? ")
lowercase = response.lower()
affirmative = lowercase.startswith('y')
Here we used two methods of strings: lower and
startswith. The lower method doesn't need any
additional arguments beyond the value that it's attached to (but the
parentheses are still required to actually call the method), while the
startswith method needs one additional argument (which we put inside
the parentheses after the method name, just like when we call a regular
function). In both cases, the thing before the period (response or
lowercase) is functioning like an extra argument to the method (e.g.,
what are we getting a lowercase version of? The response value).
Why are some functions just built-in and others methods of a particular
type? That's because when a function can only work with a specific type
of data, making it a method helps prevent errors, because you can't
accidentally try to use it with another kind of value. It also helps
organize things conceptually. For example, len is a built-in function
because it can work with any type of sequence, including strings, lists,
etc. On the other hand, lower is a method, because it only makes sense
in the context of strings.
The table below includes brief reference explanations for the common
methods that we'll use in this class, along with tiny examples of how
they can be used correctly (feel free to paste those examples into
your Python shell to see what the results are and double-check your
understanding). Remember you can always use the help
function to get more information about another function; in the case of
methods, you could write something like help(str.lower) or
help(list.append) because you still need to reference a particular type
to get access to a method.
| String | Function | Effect | Example(s) |
|---|---|---|
.lower / .upper / .capitalize
|
These methods return a string based on the string they're attached to but with different case for some letters. .lower returns the same string in all-lower-case, .upper in all-upper-case, and .capitalize returns the string with the first letter in upper case and the rest in lower case. These functions don't modify the original string (that's impossible since strings are immutable), but instead they return a new, similar string.
|
'abc'.capitalize() |
.startswith / .endswith
|
These methods return booleans (True or False) based on whether the string they're attached to starts or ends with another string (supplied as an argument after the method name). To qualify, the first (or last) letters of the string the method is attached to must be exactly the same as the provided argument. |
'abc'.startswith('ab') 'abc'.endswith('b')
|
.isspace / .isalpha / .isdigit / .isnumeric / .isalnum
|
These methods also return booleans, based on what kind of characters are in the string they're attached to. .isspace returns True if every character in the string is a white-space character (like a space, or a tab, or even a new-line). .isalpha returns true if every character in the string is an 'alphabetic' character, including characters in non-Latin alphabets, but excluding things like spaces, numbers, punctuation, etc. .isdigit returns true if every character is an Arabic numeral (i.e., 0, 1, 2, 3, 4, 5, 6, 7, 8, or 9), whereas .isnumeric returns true if every character is a numeric character, including Arabic numerals and others like 'ⅶ' or '一'. Finally, .isalnum returns true if every character is either alphabetic OR numeric. Each of these functions returns False for an empty string.
|
' \n\t'.isspace()' 'Otter獭'.isalpha() '123'.isdigit() '一二三四'.isnumeric() 'one23'.isalnum()
|
.format
|
This is a very powerful method that lets you construct a string by placing other Python values inside of a template string. Wherever a pair of curly braces appears in the template, an additional parameter will be required, and the value of that parameter will be converted to a string and will replace the corresponding curly brace pair within the template to produce the result. For example: '{} golden {}'.format(5, 'rings') will return the string '5 golden rings'. Compared to concatenating strings, .format usually makes it easier to control the spacing around values that you're building into a larger string, and like print, it converts values to strings automatically. .format also has advanced capabilities beyond those described here.
|
'{}-{} {}.'.format("a", "b", "c") 'There are {} matching lines.'.format(nmatches)
|
.join
|
Builds a string by combining multiple strings from a sequence (the argument) into a single string, with a 'glue' string (the string that .join is attached to) placed in between each pair of items. If the sequence you give it is empty, it will return an empty string, and if the sequence contains just a single string, you'll get just that string back. The items in the sequence you supply must be strings (but of course, strings themselves count as sequences of one-character strings).
|
', '.join(['a', 'b', 'c']) '-'.join('123')
|
.split
|
Returns a list of strings by splitting up the string it's attached to. If no arguments are given, the attached string is split wherever one or more white-space characters appear. If an argument is given, it must be a string, and anywhere that that particular pattern occurs within the string that .split is attached to, the string will be split. The patterns used to split are removed from the results. If the split pattern doesn't appear in the string to be split, a list containing that entire string is the result. If the split pattern appears at the start or end of the string, the resulting list will include an empty string at the beginning or end.
|
'A few words.'.split() 'banana'.split('a')
|
.strip
|
Removes certain characters from the beginning and/or end of a string, returning a new string. By default, removes any mix of whitespace characters (spaces, tabs, newlines, etc.). If an argument is given, it should be a string, and any mix of characters from that string will be removed. Stops on each end when it sees a character it isn't allowed to remove, and doesn't remove any characters from the middle of the string. |
' with spaces \n'.strip() 'banana'.split('ab')
|
List | Function | Effect | Example(s) |
.append
|
Modifies the list that it's invoked on (i.e., the list it's attached to) by adding a single element as the new last element of the list. The element to be added is supplied as an argument. Use .extend instead if you want to add multiple elements at once. This method doesn't return anything, so you can't use it productively with = or return. It's usually more appropriate to use it as a separate step and then return or assign the list that you just modified.
|
|
.insert
|
Modifies the list that it's invoked on by inserting a single element before the specified index (the two arguments are the index to insert at, followed by the value to insert). If the index you provide is greater than or equal to the length of the list, the element will be inserted at the end. Except in that case, after the insertion is done the element that was inserted will be at the index that it was inserted before (because the old element there and all subsequent elements get pushed one index later). Like .append, this function doesn't return anything.
|
|
.pop
|
Modifies the list that it's invoked on by removing the element that's at the specified index (the only argument). If no argument is supplied, it removes the last element from the list. An IndexError will happen if attempting to pop at an index that doesn't exist, including attempts to pop from an empty list. This method returns the value that it removes. If you just want to know the value at a specific index, just use [] to access it; use .pop only if you need to remove an item.
|
|
.extend
|
Modifies the list that it's invoked on by adding multiple elements from another sequence at the end. The sequence of elements to add is provided as an argument, and will not be modified. Note that strings count as sequences of individual letters, but extending a list with a string is usually not what you want to do, since each letter would be added as a separate element in the list you're extending. |
|
.index
|
Returns the index of the first element in the list it's attached to which matches the argument it's given. A ValueError will happen if there are no matching elements (matching is determined by ==). If there are multiple matches, only the index of the first match is returned. In particular, you CANNOT depend on .index to tell you your position in a list during a loop, because if that loop contains multiple copies of some values, .index won't give you the correct results for copies after the first. If you need to know your index within a loop, convert your loop to an index loop.
|
|
.remove
|
Modifies the list that it's invoked on by removing the first element of the list that matches the supplied argument. This method starts at the beginning of the list and moves along until it finds an element that's equal to the argument given, which it then removes. A ValueError will result if there are no matching elements in the list, you can use the in operator to test for that beforehand. Note that if there are multiple matching items, only the first will be removed. Be careful of the difference between .pop and .remove. In most cases, using .pop is more exact.
|
|
.sort
|
Reorders the list so that items are in order. By default, the ordering is determined by the kinds of items: for numbers they are sorted from smallest to largest, and for strings they are sorted alphabetically. A key= keyword argument may be provided and must be a function that will be applied to each item to determine its 'sort key'. If the sort key is a number items will be sorted from smallest to largest sort key, if it's a string they'll be sorted alphabetically by sort key. The sort key can also be a tuple or list, in which case items are sorted by the first element of that sequence, and ties are broken by the second element, double-ties by the third element, and so forth.
|
|
Dict | Function | Effect | Example(s) |
.keys
|
Returns a collection containing just the keys of the dictionary. Note that it's a collection, not a sequence: it doesn't have an established order (although it has an implicit order) and it cannot be indexed (although it can be iterated over). |
|
.values
|
Returns a collection containing just the values of the dictionary. Note that it's a collection, not a sequence, just like the result of .keys.
|
|
.items
|
Returns a collection containing key/value pairs from the dictionary. Like .keys and .values, it's not a sequence. Each item in the collection is a tuple that holds a key and the associated value for that key.
|
|
.get
|
Returns the value associated with a key in the dictionary (the key is provided as an argument). Unlike the [] operator, if the specified key isn't in the dictionary, instead of raising an error it will return None. If two arguments are given, the second is used as a default instead of None. A more deliberate approach than using .get is to use the in operator to check for the presence of a key and then use either the [] operator to get the value or use a default value using a conditional.
|
|
.pop
|
Removes a key/value pair from the dictionary, specified using the key as an argument. Returns the value part of the pair. Raises a KeyError if the target key isn't in the dictionary (use the in operator to check for that).
|
|
.update
|
Updates multiple values in the dictionary at once by copying over key/value pairs from another dictionary (provided as an argument). Only the dictionary it's invoked on is modified. For each key in the dictionary being updated from, the value for that key in the dictionary being modified will be set to the value that's in the dictionary being updated from, regardless of whether that key already had a value in the dictionary being modified. In other words, new key/value pairs are added where necessary, and where a key already exists, its old value is updated. |
|
Set | Function | Effect | Example(s) |
.add
|
Adds a single value to the set. Has no effect if that value is already present (sets cannot contain duplicates). |
|
.union
|
Returns a new set with all elements from this set and the given set (or other collection). The | operator also does this (but only on two sets).
|
|
.intersection
|
Returns a new set with all elements that are in both this set and the given set (or other collection). The & operator also does this (but only on two sets).
|
|
.difference
|
Returns a new set with all elements that are in this set but NOT in the given set (or other collection). The - operator also does this (but only on two sets).
|
|
.symmetric_difference
|
Returns a new set with all elements that are in this set but NOT in the given set (or other collection), plus all elements that are in the other set but NOT in this one. Unlike .difference, this is symmetric. The ^ operator also does this (but only on two sets).
|
|
File Manager | Function | Effect | Example(s) |
| Note | File manager objects are obtained by calling open. Which methods can be used depends on the mode argument given when the file is opened. | |
.read
|
Reads the entire contents of the file, returning a single string. If there are multiple lines of text in the file, this string will contain newline characters. Only works if the file was opened in read mode (see open). If some text from the file has already been read, .read just reads whatever remains.
|
|
.readline
|
Reads a single line from the file, and advances to the end of that line in the file manager, so that the next call to readline will read the next line. The lines that you get are the same as if you loop over the file manager using for. The file must be in read mode (see open).
|
|
.readlines
|
Works like .readline, but reads all remaining lines in the file, and returns a list containing them.
|
|
.write
|
Writes text into the file. Only available when the file is open in write or append mode (see open). Unlike print, it only accepts one argument, and it does not automatically add a newline after the text that it writes.
|
|
.close
|
Closes the file, ensuring that any text written to it actually gets saved. Until you call this (or it gets called automatically at the end of a with block) text written to the file may or may not actually be saved, and if your program terminates the file may end up with only part of what you wrote. Use with so that you can't forget to call this.
|
|
Built-in Modules
Besides the turtle/turtleBeads, wavesynth,
and optimism modules, for graphics, audio, and testing,
there are a huge array of built-in modules in Python, and there are even
more available online. In this reference page we only cover a few
functions from a couple of built-in modules that we'll use in this class.
You can think of these built-in modules as ways to extend the built-in
functions that are available.
To use functions or values from a built-in module you will need to import that module (although because it's a built-in module, you won't have to worry about where the code file for that module is). The simplest form is like this:
import mathAfter that import, you can use functions or values from the math module
by writing math. before their name. If you'd like to use those
functions or variables directly, you can instead import what you need
using from, like this:
from math import ceil, piYou can list whatever functions or values you want to import, separated
by commas, and each of those will become available in the current file,
using just its name (e.g, pi instead of math.pi). There's one more way to import things:
from math import *The * here stands for "everything" and it makes all of the functions
and variables from that module available in the current file without the
need to write math. every time. Why don't we just always use this
version? Sometimes it's nice to have your code show where each value is
coming from, so that someone reading it doesn't get confused (e.g., did
the 'ceil' function come from a module, or was it defined here?). This
gets especially important if you end up importing multiple modules, since
there would be no way for someone to look up where a function came from
without looking through each imported module to find it. So we generally
stick to the first form of import except in cases where we'll be using a
lot of different names from a module very frequently, like with turtle,
turtleBeads, and wavesynth.
The table below includes brief reference explanations for a few functions
and/or values from several built-in modules that we'll use in this class,
along with tiny examples of how they can be used correctly (feel free to
paste those examples into your Python shell to see what the
results are and double-check your understanding). Remember you can always
use the help function to get more information about a
function or module, and you can also use dir to list
the contents of a module.
| math | Function | Effect | Example(s) |
|---|---|---|
ceil
|
Returns the smallest integer that's greater than or equal to the number you give it. Whereas round rounds to the nearest integer and int chops off the decimal part, ceil always rounds up.
|
four = math.ceil(3.01)
|
floor
|
Works like ceil but rounds down (towards negative infinity) instead of up. Note that for positive numbers, int does the same thing, but for negative numbers, they're different.
|
four = math.floor(4.99)
|
pi
|
The transcendental number describing the ratio between the circumference of a circle and its diameter. This isn't a function; it's just a number. Useful for specifying angles in radians, since 2π radians is 360 degrees. |
radians = 45 * math.pi / 180
|
random | Function | Effect | Example(s) |
seed
|
Sets the 'seed value' for the random number generator. The sequence of random numbers produced will always be the same when starting from the same seed. If you never call this function, a default seed will be in place based on a variety of factors including when your program is run, so you should get different values each time you run the program. But if you do call seed, you should get the same sequence of random results every time. Very useful for testing random programs. Note that each call to a random-number or random-choice function in the random module advances the random sequence, so for two programs to stay in-sync after setting up the same seed, they must make exactly identical calls to random functions. This function doesn't return anything.
|
random.seed(128912)
|
randint
|
Accepts a lower and an upper limit (both integers) and returns a pseudo-random integer between them (inclusive on both ends). The exact number returned each time depends on the seed value and on how many other random functions have been used since then, so it's effectively random.
|
reps = random.randint(4, 7)
|
random
|
Returns a pseudo-random floating-point number between 0 (inclusive) and 1 (exclusive). If you want a different range, you can always multiply the result and/or add to it. Like randint, the exact result depends on the seed value and how many other random calls have happened since the seed was established.
|
angle = 2 * math.pi * random.random()
|
choice
|
Given a sequence of items, returns one of them at random (depending on the seed value and how many other random functions have been used). If multiple copies of a value are included, that value will be more likely to be selected, since the function doesn't pay attention to the values when picking one.
|
color = random.choice(['blue', 'green', 'pink', 'pink'])
|
json | Function | Effect | Example(s) |
load
|
Loads Python data structures from text in a JSON-format file. Works with a file reader object (see open). Returns whatever kind of object was stored in the file, including lists and/or dictionaries.
|
|
dump
|
Stores Python data structures into a file in JSON format. Works with an object to dump (can include lists and/or dictionary) and file writer object to dump into (see open).
|
|
csv | Function | Effect | Example(s) |
DictReader
|
Allows access to CSV data as a list of dictionaries. Like a file-reader, a csv.DictReader doesn't actually read the data until asked to do so. Use it as the loop sequence in a for loop to read rows one-by-one as dictionaries, where the first row of the file determines the key for each column. You can also use the list function to read the data into one big list of dictionaries. Requires a file reader as an argument; the file should be opened with newline=''.
|
|
DictWriter
|
Allows for writing a CSV file row-by-row using dictionaries, where columns are specified up front and each dictionary must contain a key for each column. Returns a writer object with .writeheader, .writerow, and .writerows methods for writing the header, one row, or multiple rows at once. Requires both a file writer and a columns sequence as arguments; the file should have been opened with newline=''.
|
|
os | Function | Effect | Example(s) |
getcwd
|
Gets the current working directory. Returns a path string showing which directory Python is currently operating in. This is where files that you open will be accessed by default, and also where custom modules will be imported from. Normally, it's the same directory that the current program is saved in. |
|
listdir
|
Lists contents of the current directory, including both files and sub-directories (but not files in those sub-directories). Returns a list of strings, containing just the file/directory names, not their full paths. Use os.path.join with the directory name to construct the full path to one of these files/directories. An argument is optional, if given it should be a path string and the result will be the list of contents of that path; if no argument is given the current working directory is used.
|
|
chdir
|
Changes the current working directory to the directory specified by the argument, which should be a path (either relative or absolute). This will affect where Python imports modules from, as well as where opened files are created and/or opened from. |
|
os.path | Function | Effect | Example(s) |
| Note |
This is a sub-module of the os module. You can import it directly via import os.path, or you can just do import os and then reference these functions using os.path.*, for example os.path.join.
|
|
exists
|
Returns True or False depending on whether the given path refers to a file or directory that already exists, or not.
|
|
isdir
|
Returns True if the specified path exists and is a directory, and False otherwise (including if it doesn't exist).
|
|
isfile
|
Returns True if the specified path exists and is a file, and False otherwise (including if it doesn't exist).
|
|
join
|
Takes any number of string arguments and treats each as a directory name (or the last one as a file name) and puts them together into a single path string. Uses either / or `\` to separate directory names as appropriate for the current operating system.
|
|
basename
|
Given a path string, returns just the final directory or filename part of the path. If the path ends with a path separator (/or `\`, depending on the operating system) then it will return an empty string.
|
|
getsize
|
Given a path string, returns the size of that file or directory, as an integer number of bytes. For directories, just returns the size of the bookkeeping information for the directory, not the total size of all files/subdirectories it contains. |
|
Turtle Reference
The turtle built-in module is used for drawing graphics in Python.
turtleBeads.py is a custom module that adds a few commands to easily
draw certain shapes centered on the current turtle position, like
circles, ellipses, and polygons. This page covers the core commands from
both modules and briefly describes how to use them. If you need more
details, remember that you can get help for any Python function by
calling the built-in help function, for example, you could get help for
the turtle penup command by running:
help(penup)You can download the latest version of turtleBeads.py at this link:
The colors page has pictures showing all of the
color names you can use with turtle.
Getting Started
To draw with turtle graphics, you will need to import the built-in turtle
module. To do this, add a line of code at the top of your file that looks
like this:
from turtle import *The '*' here means "everything," and this style of import makes the functions
in the turtle module directly available.
If you also want to use turtleBeads functions, you should add:
from turtleBeads import *to the top of your file as well. Make sure the turtleBeads.py file is in the
same directory as the file that you are writing your code in, otherwise Python
won't be able to import it and you will get an error.
| Turtle Functions | Basic Movement: | Function | Effect | Example(s) |
|---|---|---|
fd / forward
|
Move the turtle forward. |
fd(100)
|
bk / back / backward
|
Move the turtle backward. |
bk(100)
|
lt / left and rt / right
|
Turn the turtle left or right (in degrees). |
lt(90)
|
circle
|
Moves the turtle forward in an arc curving to the left. Two arguments specify radius and how far around the circle to go (in degrees). |
circle(100) circle(-50, 90)
|
speed
|
Sets how fast the turtle moves. 1 is slowest, 10 is fastest, and 0 makes the turtle jump instantly instead of moving (which is even faster than speed 10). See also: noTrace.
|
speed(3)
|
Absolute Movement: | Function | Effect | Example(s) |
seth / setheading
|
Sets the turtle's direction. 0 is due East and positive headings are counterclockwise (so 90 is North). |
setheading(180)
|
setpos / setposition / goto / setx / sety
|
Move the turtle from its current position to a new absolute position. setx and sety change either the x or y coordinate without affecting the other. The turtle will still draw while moving unless the pen is retracted. (0, 0) is in the center of the window, +x is to the East, and +y is to the North.
|
setpos(100, 50) sety(0)
|
Pen Control: | Function | Effect | Example(s) |
pu / penup
|
Retracts the pen, so that the turtle no longer draws as it moves. |
penup()
|
pd / pendown
|
Extends the pen, so that the turtle draws as it moves. Pen is extended when the program begins. |
pendown()
|
pencolor
|
Sets the color of the pen by name or using red, green, and blue values between 0 and 1. For color names, refer to color charts linked from the quick reference page. |
pencolor("Blue") pencolor(0,0.3,0.7)
|
pensize
|
Sets the size of the pen. |
pensize(3)
|
Filling Shapes: | Function | Effect | Example(s) |
begin_fill / end_fill
|
Call begin_fill when the turtle is in position to draw a shape, and end_fill once the shape is complete. The region enclosed by the turtle between these two calls will be filled with the current fill color when the end_fill happens.
|
|
fillcolor
|
Sets the color to be used when end_fill is called. Accepts same colors as pencolor. |
fillcolor("Forest Green") fillcolor(0,0.4,0)
|
color
|
Can be used to set pen and fill color at once. With two arguments, sets pen and fill color to different values. |
color("Peach Puff") color("Misty Rose", "Lavender")
|
Text: | Function | Effect | Example(s) |
write
|
Use drawText instead. Writes text to the screen, North of the current turtle position (cannot be rotated). Accepts optional arguments to specify whether to move the turtle, how to align the text, and what font to use.
|
write("Test") write("Test", True, "left", ("Arial", 12, "bold))
|
Measurements: | Function | Effect | Example(s) |
pos / position / xcor / ycor
|
pos and position return the current position of the turtle as a pair of x and y coordinates. xcor and ycor return the individual x- and y-coordinates as numbers if you need to do math with them.
|
print(position()) x = xcor()
|
heading
|
heading returns the current direction that the turtle is facing, in degrees. 0 is due east, and 90 is north.
|
h = heading()
|
towards
|
towards returns the direction that the turtle would have to point in (for example by using seth) in order to move towards a specific position.
|
|
distance
|
distance returns the distance between the current position and the given x/y position.
|
|
Miscellaneous: | Function | Effect | Example(s) |
title
|
Sets the window title for the turtle window. |
title("Drawing")
|
bgcolor
|
Sets the background color of the turtle window. |
bgcolor("Light Sky Blue")
|
reset
|
Clears everything that's been drawn and puts the turtle back in the middle of the window facing East. Does not reset the title or background color. |
reset()
|
stamp
|
Stamps a copy of the turtle cursor onto the window at its current position. Can be used to show where the turtle was at a particular point in the code. |
|
Turtle Beads Functions | Movement: | Function | Effect | Example(s) |
realign
|
Shortcut for setheading(0).
|
realign()
|
teleport
|
Retracts the pen, uses setpos to move to the given x/y position, and then extends the pen. Use to move the turtle to specific coordinates without drawing.
|
teleport(50, -20)
|
leap
|
Retracts the pen, moves forward the given distance, and then extends the pen. Use to move the turtle relative to its current position without drawing. |
leap(30) leap(-25)
|
hop
|
Works like leap, but moves sideways (positive to the left or negative to the right) without changing the turtle's orientation. Like leap, it does not draw while moving.
|
hop(15) hop(-5)
|
Drawing Shapes: | Function | Effect | Example(s) |
drawCircle
|
Draws a "circle" made out of many small lines just like the regular circle function, but centers it on the current turtle position, and puts the turtle back where it started when it's done. The argument specifies the radius of the circle.
|
drawCircle(50)
|
drawEllipse
|
Draws an ellipse centered on the current turtle position, with the given radius and aspect ratio (i.e., ratio between the two radii of the ellipse). The given radius extends to the left and right of the given turtle position, while the other radius extends in front of and behind the turtle. As with drawCircle, the turtle ends up where it started.
|
drawEllipse(100, 0.5) drawEllipse(50, 2)
|
drawDot
|
Draws a filled circle centered at the current turtle position, using the pen color as the fill color and without any border. The argument specifies the radius of the dot. The result is faster and more smoothly circular than drawCircle, but cannot have separate pen and fill colors.
|
drawDot(15)
|
drawSquare
|
Draws a square centered at the current turtle position, and puts the turtle back where it started. The argument determines the length of each side of the square. |
drawSquare(50)
|
drawRectangle
|
Draws a rectangle centered at the current turtle position, and puts the turtle back where it started. The arguments determine the rectangle's length (to the front and back of the turtle) and width (to the left and right of the turtle) respectively. |
drawRectangle(50, 100)
|
drawPolygon
|
Draws a regular polygon centered at the current turtle position, and puts the turtle back where it started. The arguments specify the length of each side and the number of sides, respectively. One side will always be parallel to the turtle's current position to its left. |
drawPolygon(60, 3) drawPolygon(30, 12)
|
Drawing Text: | Function | Effect | Example(s) |
fontsize
|
Sets the current font size. The default is 18. |
fontsize(32)
|
align
|
Sets the current font alignment. Must be one of "left", "right", or "center". The default is "center". |
align("left")
|
drawText
|
Draws text North of the current turtle position, without moving the turtle. Text cannot be rotated. |
drawText("Hello")
|
Miscellaneous: | Function | Effect | Example(s) |
setupTurtle
|
Resets everything including the window title and background color and creates a new turtle window if necessary. |
setupTurtle()
|
noTrace / doTrace / showPicture
|
Use noTrace to turn off animation completely, and doTrace to turn it back on. When animation is turned off, you must use showPicture to update the display (some things may not be drawn until showPicture is called). This can be even faster than speed 0 for complicated pictures.
|
|
Random Colors: | Function | Effect | Example(s) |
randomPastelColor
|
Returns a random color name string from a fixed set of lighter pastel colors. |
color(randomPastelColor())
|
randomVibrantColor
|
Returns a random color name string from a fixed set of bright highly-saturated colors of various hues. |
bright = randomVibrantColor()
|
randomMutedColor
|
Returns a random color name string from a fixed set of muted colors with medium brightness and various hues. |
pencolor(randomMutedColor())
|
randomWarmColor
|
Returns a random color name string from a fixed set of well-saturated colors with warm hues (pink, red, orange, yellow, brown, and some yellower greens). |
warm = randomWarmColor()
|
randomCoolColor
|
Returns a random color name string from a fixed set of well-saturated colors with cool hues (purple, blue, turquoise, and darker/bluer greens). |
fillcolor(randomCoolColor())
|
Wavesynth Reference
For producing (cheesy) synthesized sounds, we've written a wavesynth
module that can be used to build simple music out of notes and beats. The
selection of instruments and their quality is extremely limited, but it
allows us to make music as an alternative to drawing things with the
turtle module.
You can download the latest version of wavesynth.py at this link:
An Example
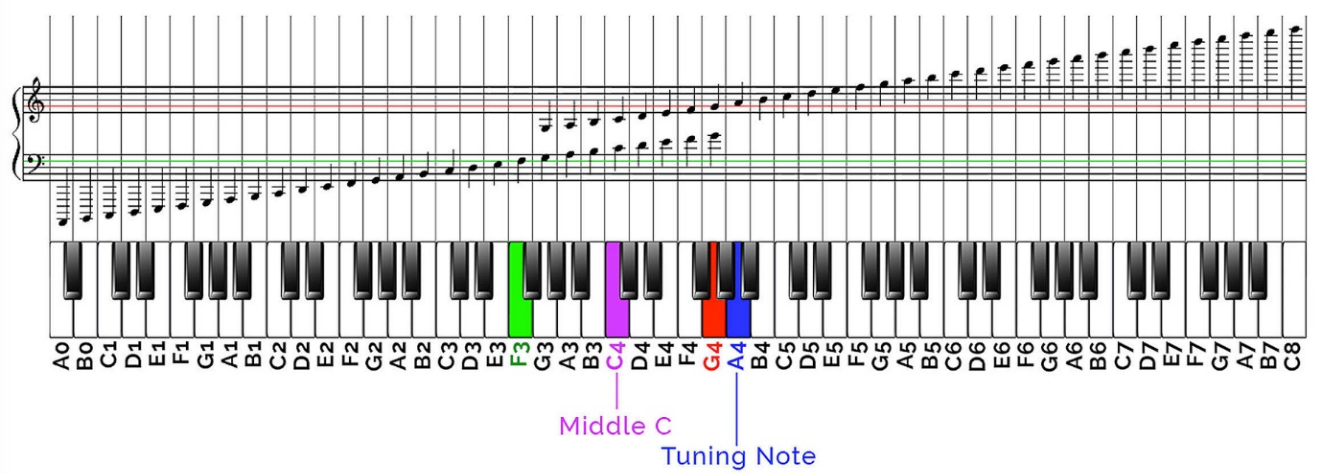
(Keyboard image from p. 49 of PIANO KEYS AND NOTES: The Definitive Guide, downloadable from https://www.musilio.com/)
The following code demonstrates a few of the wavesynth functions, which are
explained below. The above piano keyboard image is provided for reference.
from wavesynth import *

addNote(0.25) # Add note at default pitch lasting 1/4 of a second.
              # wavesynth's default pitch is "middle C" (C4), which
              # is the middle C note (a white key) on a piano keyboard.
climbUp(1) # Move current pitch up to next note in default scale.
           # wavesynth's default scale is C major, which includes only
           # the white keys on the piano. The next note above C4 is D4,
           # the white key directly to the right of the middle C key.
addNote(0.25)
climbUp(1) # Move up to next note in C major scale = E4.
addNote(0.25)
climbUp(1) # Move up to next note in C major scale = F4.
addNote(0.25)
climbUp(1) # Move up to next note in C major scale = G4.
addNote(0.25)
climbDown(4) # Move back to original note (C4)
addNote(0.25)

setTime(0) # Reset time to beginning of song to add drum track
           # that will be played together with above notes.
quieter(4) # Make following beats quieter than the notes.
addBeat(0.25) # Add beat lasting 1/4 of a second from default drum.
              # wavesynth's default drum is a snare drum.
addRest(0.25) # Add 1/4 of a second of silence before next drum beat .
addBeat(0.25)
addRest(0.25)
addBeat(0.25)

printTrack() # Display a printed representation of the song's notes and beats.
saveTrack('example.wav') # Save song into an audio file named 'example.wav'.
                         # You can play this audio file using a music app.
playTrack() # Opens a new tab/window to play sound unless either 'pyglet'
            # or 'simpleaudio' is installed.
Note that in order for wavesynth.py to play sounds directly from within
Python, you'll need to use the "Manage Packages" feature in the "Tools"
menu in Thonny to install the "pyglet" package, although you can use
wavesynth.py without this feature to produce .wav files that you can
use a separate media player program to play back.
Music Concepts
To use this module you will need a basic grasp of some musical concepts, although you will not need to be familiar with music theory or know how to play an instrument. The basic concepts you'll need are:
- Notes vs. beats vs. rests. A note is a sound that can be higher or
lower, like the sound of a piano or the sound of whistling. A beat is
a sound that can't be higher or lower, like the sound of a drum or a
clap. A rest is just a period of silence. The
addNote,addBeat, andaddRestfunctions are used to create these kinds of sounds, and each function requires a duration as the parameter to specify how long the sound lasts. Other aspects of the sound, like how high or low it is (if it's a note) or what instrument it sounds like (for notes and beats) are remembered automatically from sound to sound, and can be changed using specific functions that change them. - Time.
wavesynthmeasures time in seconds, and it keeps track of the "current time" behind the scenes. Every note that you create starts at the current time, and when you create a note, beat, or rest, the current time is advanced to the end of that sound, so that callingaddNoterepeatedly will add notes that follow each other directly in time. If you want to have notes (or beats) that overlap each other, you can use therewindorfastforwardfunctions to subtract from or add to the current time. - Volume. Notes and beats can be louder or quieter, with some
limitations.
wavesynthkeeps track of the "current volume" and this is used for any notes and beats created; it can be changed using thesetVolume,louder, andquieterfunctions. -
Pitch. Unlike beats and rests, notes can sound "higher" or "lower." "Pitch" refers to how high or low a note is, and we make musical melodies by sequencing notes of different pitches. In between notes,
wavesynthremembers the current pitch, and to control the pitches of notes we call pitch-changing functions before callingaddNote. There are two ways to change pitch inwavesynth:-
A "half-step" is the smallest change in pitch that the
wavesynthmodule can easily create, and there arehalfStepUpandhalfStepDownfunctions for setting the pitch higher or lower by some number of half steps. Half steps are used as part of the basis for classical music, and there are 12 half-steps in an "octave," and about 4-5 octaves between the highest and lowest notes humans usually sing.On a piano keyboard, a half step up corresponds to the next key (white or black) to the right on the keyboard (see image below). E.g., a half step up from the white C key is the black key known both as "C sharp (C#)" and "D flat (Db)". A half step up from that black key is the white D key. In some cases, a half step up goes from one white key to another (e.g., F is a half step up from E, C is a half step up from B). The "12 half steps in an octave" corresponds to the 12 keys (7 white and 5 black) in the keyboard image.
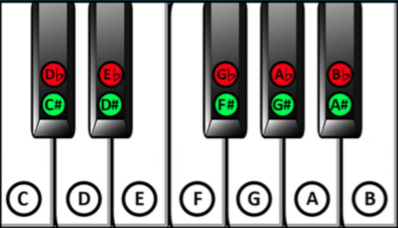
(Keyboard image from p. 44 of PIANO KEYS AND NOTES: The Definitive Guide, downloadable from https://www.musilio.com/)
- The
climbUpandclimbDownfunctions change pitch according to a "scale" which is a pre-selected sequence of pitches. You can change the current scale using eithersetFundamentalto set the base note of the scale, orsetScaleTypeto change what type of scale it is. You don't need to use these functions, but they can help you control things if you know a bit about music. The default scale is "C Major" which corresponds to a fundamental note of "C" with a scale type of "Major". If you're having trouble finding pitches that sound good together, one thing to try to is to change the scale type to"Pentatonic-Major"by using:setScaleType("Pentatonic-Major"). Pentatonic scales have only 6 notes in an octave, and most pairings of pentatonic notes sound good.
wavesynthalso defines some variables representing specific pitches (see the pitch details section for details), and you can usesetPitchwith these values to set the current pitch regardless of its previous value. -
wavesynth functions
What follows is a summary of each of the most important wavesynth
functions that you'll need to use, including a brief description of what
the function does and examples of how it could be used.
Note that the simplest way to get access to these functions is to use the
following import statement (assuming that wavesynth.py is in the same
directory as the file you're working on):
from wavesynth import *| Basic Sounds: | Function | Effect | Example(s) |
|---|---|---|
addRest
|
Adds a period of silence to the current track (see setActiveTrack). The argument specifies how long the rest will be. If the end of the rest is after the end of the current track, the track's duration will be increased. The rest starts at the current time (see setTime), and the current time will be updated to the end of the rest after the rest is added.
|
addRest(0.4) |
addBeat
|
Adds a percussive sound (with no specific pitch) to the current track (see setActiveTrack). The argument specifies how long the beat will be. If the end of the beat is after the end of the current track, the track's duration will be increased. Use setTime, setVolume, and setDrum to control when the beat happens, how loud it is, and what kind of drum is used. The current time will be updated to the end of the beat after it is added.
|
addBeat(0.2) |
addNote
|
Adds a note to the current track (see setActiveTrack). The argument how long the note will be. If the end of the note is after the end of the current track, the track's duration will be increased. Use setTime, setVolume, setInstrument, and setPitch plus related functions like fastforward or climbUp to control when the note occurs, how loud it is, what pitch it's at, and what instrument is used. The current time will be set to the end of the note after it is added.
|
addNote(0.2) |
Instruments: | Function | Effect | Example(s) |
kick
|
A percussion instrument (use it with setDrum) meant to sound like a kick drum: a deeper reverberating sound. Kick drums are non-trivial synthesize, so this instrument won't sound that great, especially if you're using laptop speakers.
|
setDrum("kick") setDrum(kick)
|
snare
|
Another percussion instrument (use it with setDrum) meant to sound like a snare drum: a sharp and loud sound. Snare drums are easier to synthesize, so this works better than kick.
|
setDrum("snare")
|
beep
|
A very basic pitched instrument (use it with setInstrument) that sounds like (and well, is) an electronic beep.
|
setInstrument("beep")
|
keyboard
|
A basic pitched instrument (use it with setInstrument) that's supposed to sound vaguely like a piano.
|
setInstrument("keyboard")
|
harmonica
|
A pitched instrument (use it with setInstrument) that's supposed to sound vaguely like a harmonica or other wind instrument.
|
setInstrument("harmonica")
|
Instrument Controls: | Function | Effect | Example(s) |
setDrum
|
Sets the current drum function to be used when addBeat is called. The argument may be either a drum function (e.g. kick; see above) or the name of one of those functions as a string. The default drum is snare.
|
setDrum(kick) setDrum("snare")
|
currentDrumName
|
Returns the name (a string) of the current drum function. |
drum = currentDrumName()
|
setInstrument
|
Sets the current instrument function to be used when addNote is called. The argument may be either an instrument function (e.g. harmonica; see above) or the name of one of those functions as a string. The default instrument is keyboard.
|
setInstrument(beep) setInstrument("harmonica")
|
currentInstrumentName
|
Returns the name of the current instrument as a string. |
name = currentInstrumentName()
|
| Note: |
If you're using a custom drum or instrument function (not covered in this documentation) you will not be able to use the strings returned by currentDrumName or currentInstrumentName with setDrum or setInstrument later. There are currentDrum and currentInstrument functions that can return the actual drum/instrument function in use.
|
Pitch Functions: | Function | Effect | Example(s) |
setPitch
|
Sets the current pitch value, which will be used for subsequent calls to addNote. There are constants like A3, Bb4 and P10 defined for both scientific pitch notation and a couple of octaves of pentatonic scale, and you can also just provide a number in Hertz. Use currentPitch to access the current pitch value.
|
setPitch(440) setPitch(A3) setPitch(P5)
|
currentPitch
|
Returns the numeric value of the current pitch. Use currentPitchName if you want to know what the pitch is close to in terms of scientific pitch notation. The value returned here can be used later with setPitch to set the pitch back to its old value.
|
pitch = currentPitch()
|
currentPitchName
|
Returns a string describing the current pitch. Use currentPitch if you want to get the numeric value instead. The string will try to describe the pitch based on scientific pitch notation if it can, but will include a number in Hertz if necessary.
|
name = currentPitchName()
|
pitchName
|
Returns a string describing a given pitch (provided as a number). Used by currentPitchName, but you can also use it with other numbers yourself.
|
|
halfStepUp
|
Modifies the current pitch value (see setPitch) so that it is one half-step above the old value. An optional argument specifies a number of half-steps to take, which could be negative to take half-steps down (but there's also halfStepDown for that). One half step up is the same as multiplying by 21/12, or about 1.05946, while one half-step down is the same as dividing by this value.
|
halfStepUp() halfStepUp(3) |
halfStepDown
|
Works just like halfStepUp (including the optional argument) but takes half-steps down instead of up.
|
halStepDown() halfStepDown(5)
|
climbUp
|
Modifies the current pitch value (see setPitch) so that it's one or more notes higher on the current scale (see setFundamental and setScaleType). If the pitch isn't a note on the current scale, it will be rounded to the nearest note on the scale first. Like halfStepUp, an argument may be provided to climb up multiple notes at once, and a negative argument will climb down (but see also climbDown).
|
climbUp() climbUp(2) |
climbDown
|
Works just like climbUp, except it lowers the current pitch instead of raising it. The same rounding rules apply.
|
climbDown() climbDown(2)
|
Key Controls: | Function | Effect | Example(s) |
currentKey
|
Returns a pair containing the current fundamental note name (a string like "C") and the current scale type (normally a string like "Major"). See also currentFundamentalName and currentScaleType).
|
currentKey()
|
currentFundamentalName
|
Returns a string containing the note name for the current fundamental note (e.g., "C" or "Ab"). Use currentFundamental to get a pitch value instead of a note name.
|
currentFundamentalName()
|
currentFundamental
|
Returns the pitch value in Hz for the current scale's fundamental note, positioned in octave 0 of scientific pitch notation. Use currentFundamentalName to get the generic pitch name instead of a pitch number.
|
currentFundamental() |
setFundamental
|
Changes the current key by establishing a new fundamental tone. Requires a note name as a string, like "C", "Eb" or "Fs". Use currentFundamentalName to get the current name. Use setScaleType to change the scale type. The default is "C".
|
setFundamental('C') |
currentScaleType
|
Returns the current scale type as a string. See setScaleType.
|
currentScaleType()
|
setScaleType
|
Changes the current key by changing the scale type. While the fundamental note controls where the scale starts, the scale type controls the intervals between notes in the scale. The options are: "Major", "Minor-Natural", "Minor-Harmonic", "Minor-Melodic", "Pentatonic-Major", "Pentatonic-Minor", "Pentatonic-Yo", and "Pentatonic-In". Use currentScaleType to get the current type; the default is "Major".
|
setScaleType('Pentatonic-Major') |
Volume Controls: | Function | Effect | Example(s) |
setVolume
|
Sets the current volume. The single argument must be a number between 0 and 1 (inclusive). Notes and beats added (see addNote and addBeat) will be louder or quieter as a result. Note that the starting volume is 0.6, and the volume cannot be set higher than 1.0.
|
setVolume(0.8) setVolume(0)
|
currentVolume
|
Returns the current volume level, as a number between 0 and 1 (inclusive). |
vol = currentVolume()
|
louder
|
Increases the current volume a bit (multiplies it by 1.5). Optionally, a single argument may be provided to increase the volume by multiple steps at once (it will respect the max volume of 1.0). |
louder() louder(2.5)
|
quieter
|
Decreases the current volume a bit (divides it by 1.5, which is the same as multiplying by 2/3). Multiple steps may be taken by providing an argument. One step quieter is exactly the opposite of one step louder.
|
quieter() quieter(2)
|
Time Controls: | Function | Effect | Example(s) |
setTime
|
Sets the current position in time. The single argument must be a non-negative number measured in seconds. Note that the addRest, addBeat, and addNote functions all create sound (or silence) starting at the current time, and they also update the current time value to the end of the rest/beat/note that they created. Setting the time to a position after the end of the current track is fine (the track will automatically expand once something is added) but doing so will not actually cause the track to extend until something is added (use addRest to add silence at the end of a track). Usually, using rewind and/or fastforward is more convenient.
|
setTime(0) setTime(2.5)
|
currentTime
|
Returns the current time, which is a non-negative number measured in seconds. |
currentTime
|
rewind
|
Subtracts from the current time, moving backwards by the given number of seconds. If this would result in a current time before 0, the time is just set to 0. This can be used to layer notes on top of each other to form chords. |
rewind(3.5) |
fastforward
|
Adds to the current time, moving forwards by the given number of seconds. This is the opposite of rewind. If a negative number is given, the current time will be moved backwards, but if this would result in a time before 0, the time will just be set to 0 instead.
|
fastforward(1.1)
|
Track Controls: | Function | Effect | Example(s) |
setActiveTrack
|
setActiveTrack takes a track name string as its only parameter and either creates a new track with that name or switches to the existing track with that name. Any notes that are added are always added to the current track, and setActiveTrack changes which track is current. If you never call setActiveTrack, a track named "default" is used for any notes that are added.
|
setActiveTrack("drums")
|
eraseTrack
|
Completely erases the contents of the current track, and sets its duration back to zero. Use setActiveTrack to control which track is the current one.
|
eraseTrack()
|
trackDuration
|
Returns the duration of the current track, starting at t=0 and ending at the end of the last note, beat, or rest that has been added to the track. |
d = trackDuration()
|
mixTracks
|
Mixes two tracks together to create a third, new track. The first two parameters name the tracks to be mixed, while the last parameter is the name of the new track that will be created (it must not already be used by an existing track). |
mixTracks('melody', 'harmony', 'song')
|
Generating Output: | Function | Effect | Example(s) |
printTrack
|
Prints out a summary of the notes, beats, and rests that have been added to the current track. Can be useful for verifying the exact pitches or durations of different notes. This should not take a long time to run. |
printTrack()
|
prepareTrack
|
Prepares the current track for playback or saving to a file. You do not need to call this function, because it will be called automatically when saveTrack or playTrack is called for the first time. However, this function takes a while to run (usually a little longer than the duration of the track you're preparing), so be patient. Thankfully, once this function has been called, whether manually or automatically, the results are saved, and both saveTrack and playTrack should be quick afterwards.
|
prepareTrack()
|
saveTrack
|
Saves the current track in a file with the given file name. The file name argument should be a string that ends with ".wav", since the file is saved in WAV format. Note that for long tracks, this uncompressed format may result in pretty large files. This function also takes some time to process the track, often roughly about as long as the duration of the track, or even a bit longer (see prepareTrack).
|
saveTrack("song.wav")
|
playTrack
|
Plays the current track using your computer's sound system. Installing the pyglet module lets it play sound directly instead of opening a file. Like saveTrack, this may take a while to prepare the track before playback starts, so be patient (see prepareTrack). The longer the track, the more time it will take to prepare. Also be warned: the default volume is pretty loud, so you may want to turn your computer's volume down first, especially if you're using headphones. Because playTrack isn't quick, if you want to listen to output several times, it's better to use saveTrack (or use both functions) and play back the saved file.
|
playTrack()
|
Pitch Details
In addition to moving pitches up and down, we'll sometimes ask you to use
specific pitches, and there are two systems that wavesynth provides for
this. Scientific pitch
notation is a
classical pitch system which labels each of the eight steps in an octave
using the letters "A" through "G", and then pairs those letters with a
number indicating which octave the note is in. So for example, the note
B3 is one octave below (i.e. 8 whole steps below, or 1/2 the frequency
of) the note B4. Similarly, G4 is 3 steps above D4. The confusing thing
about this system is that each octave starts on a C, not an A, so B3 is
only one step below C4, which is the first note in octave 4. The
wavesynth module makes global variables named for all of the pitches C0
through B9 available. In addition to these variables, there is a set of
variables named P0 through P14 which refers to successively higher notes
on a pentatonic scale. These have the same values as some of the
scientific pitch notation notes, they're just alternate names for them,
but they can be used instead for a simpler way of naming higher and lower
notes, with larger pitch differences between those notes. For reference,
P5 is equal to C4, and that tone is a reasonable "middle" tone that's
neither very high nor very low. If you happen to be familiar with musical
notation, or if you've seen sheet music and wondered about how it works,
here is an image of how these different pitch values map to sheet music
notation:

More details about pitches: in fact, the number that represents a pitch
tells us how many times per second that sound vibrates the air: "higher"
pitches are produced by faster vibrations (meaning more tiny pulses of
high-pressure air per second) while "lower" pitches have slower
vibrations. The range of frequencies that's comfortable goes from
something like 20-30 pulses-per-second on the very low end, all the way
up to something like 10,000-20,000 pulses-per-second on the high end, and
the range is so large in part because pitch is multiplicative, not
additive. In other words, when we go "up" a certain amount in terms of
pitch, we're multiplying the frequency of the note, not adding to it.
Going up by the same amount again and again represents successive
multiplications, which is why there's such a large range of values.
Pitches are stored using floating-point numbers (or rarely, integers),
and you won't have to do any of the math yourself because of the
functions like climbUp or halfStepDown
that the wavesynth module provides.
Testing with optimism
The optimism.py module that we provide allows you to easily set up
tests for your code, and check their results. It also a trace,
expect, and expectType functions which can be useful for debugging.
This section provides a brief overview of the functions in that module
and how to use them.
You can download the latest version of optimism.py at this link:
Getting Started
To use the module, you will need to import it, like this:
from optimism import *There are three steps for testing:
- Create a test manager for the function or file you want to test.
- Create one or more test cases using the manager. At this step you can specify arguments to a function or inputs that should be provided during the test.
- Check the results and/or output of your test cases. Here is where you specify what the correct results are.
For step 1, you'll create a TestManager object using
testFunction or testFile, which you
should store in a variable. That will look like:
def f(a, b):
    print(a * b)
    return a

manager = testFunction(f)
For step 2, you'll use the TestManager.case method
to establish one or more test cases. When you create a case for testing a
function, you specify the arguments to use. Adding to our previous
example, you would now have:
def f(a, b):
    print(a * b)
    return a

manager = testFunction(f)
case1 = manager.case(1, 2)
case2 = manager.case('ha', 3)
For the last step, you can use
TestCase.checkResult and/or
TestCase.checkOutputLines to check that
the result of each test case is what you expect. A complete example would
be:
def f(a, b):
    print(a * b)
    return a

manager = testFunction(f)

case1 = manager.case(1, 2)
case1.checkOutputLines('2')
case1.checkResult(1)

case2 = manager.case('ha', 3)
case2.checkOutputLines('hahaha')
case2.checkResult('ha')
If you need to test a program or function that uses the input
function to accept user input, you can call the
TestCase.provideInputs function to specify
what inputs should be provided during a test case.
If your checks don't succeed, the trace, expect,
and/or expectType function can be helpful in figuring
out more about why.
traceworks a bit likeprint, but also returns the result it displays, so you can use it in the middle of an expression.expecttakes two arguments and checks that they're the same. It prints a message indicating success or failure. You can use it to double-check how your program works.expectTypeworks likeexpect, but just checks that a value has a certain type. It can be useful to verify your assumptions about how things work.
An example that uses trace, expect, and
expectType:
import optimism as opt

# Tracing
x = opt.trace(1 + 2) * 4
opt.trace(x)

# Correct expectations
opt.expect(x, 12)
opt.expectType(x, int)

# Incorrect expectations
opt.expect(x, 'hi')
opt.expectType(x, str)
This will result in the following output:
4 1 + 2 ⇒ 3
5 x ⇒ 12
✓ t.py:8
✓ t.py:9
✗ t.py:12
  Result:
    12
  was NOT equivalent to the expected value:
    'hi'
  Test expression was:
    x
  Values were:
    x = 12
✗ t.py:13
  The result type (<class 'int'>) was NOT a kind of <class 'str'>.
  Test expression was:
    x
  Values were:
    x = 12
The first two lines are from trace, and they show the line
number, the expression used, and then the result of that expression.
After that, two lines indicate that our first two expectations were met,
and then several more lines show details about the failed expectations.
| Optimism Testing Functions | Debugging Functions | Function | Effect | Example(s) |
|---|---|---|
trace
|
Show the line number, an expression, and its result. Use it to figure out what's happening in your code. |
|
expect
|
Check that two values are equal. If they're not, details about the expression that created the first value are shown. Either way, a message is printed that includes either a check mark or an x, plus the file name and line number where the expectation was established. |
expect(1 + 2, 3) |
expectType
|
Check that the type of a value matches an expected type. If not, details about the expression that created the value are shown. Either way, a message is printed that includes either a check mark or an x, plus the file name and line number where the expectation was established. |
expect(1 + 2, int) |
Test Objects | Object Type | Effect | Example(s) |
TestManager
|
A TestManager is an intermediate object that can create test cases for a particular function or file, using the TestManager.case method. TestManagers are created by the testFunction, testFile, and testBlock functions.
|
m = testFunction(f) m = testFile('a.py') m = testBlock('print("hi")')
|
TestCase
|
A TestCase controls one specific test case, which might be certain arguments for a function, or certain inputs for a file. It is created using the TestManager.case method. The TestCase.provideInputs method can be used to specify what inputs will be provided when the case is run. The TestCase.checkReturnValue and TestCase.checkPrintedLines methods are used to check for particular result values or printed output.
|
|
Methods | Function | Effect | Example(s) |
TestManager.case
|
Creates a specific test case for the function, code block, or file that's managed by this test manager. For function testing, the arguments to be used for the test case should be given to this method directly. |
|
TestCase.provideInputs
|
Alters a test case so that when it is run, the strings passed as arguments to this method will be provided as inputs when the input function is used. Once you check a test case using TestCase.checkReturnValue or testCase.checkPrintedLines, you can't call provideInputs any more.
|
|
TestCase.checkReturnValue
|
Runs the test case and checks the result value (only applicable for function tests). Prints a message indicating whether or not the result value matched the provided expected value. Even if you call multiple check functions, the test case will only run once: the results will be remembered and re-used for subsequent checks. |
|
TestCase.checkPrintedLines
|
Runs the test case and checks that the printed output matches up line-by-line with the expected output you provide. Prints a message indicating whether or not your expectations were met. Even if you call multiple check functions, the test case will only run once: the results will be remembered and re-used for subsequent checks. |
|
Managing Output | Function | Effect | Example(s) |
showOutput
|
Show (or hide again, using False as the argument) the output that's produced during testing. By default, output captured for testing is not displayed as normal. Calling showOutput will cause it to be both captured and displayed, while calling it again with False as an argument will reverse that.
|
|
Other Functions | Function | Effect | Example(s) |
detailLevel
|
Sets the detail level for messages about expectations. Use an integer between -1 and 1, where higher numbers are more detailed. 0 is the default. |
detailLevel(-1) detailLevel(1)
|
showSummary
|
Prints a summary of the test case results so far. Call it at the end of all of your tests to quickly see how many passed or failed. |
|