CS111 Lab 11 Exercises
Task 1: Applet from scratch
This is a step-by-step follow along exercise for how to create an applet from scratch
and how to use Symantec Cafe to set up projects. To start, download the
lab11_programs folder from the CS111 download folder on nike.
We will be working with the MyApplet folder which contains one HTML file.
- Start Symantec Cafe
- To create a new project, select File-->New Project... from the menu bar

- A dialog window appears. Navigate to your copy of the MyApplet folder.
Name our new project MyApplet.proj and hit Save.

- An empty project window appears.

- To start a new file, select File-->New.

- This pops open an empty text window called untitled.

- Copy and paste the following code into the window. This is the bare minimum for an
applet. Can you tell what it does?
import java.applet.*; // use applet
import java.awt.*; // use graphics

public class MyApplet extends Applet {

  public void paint (Graphics g) {
    g.drawString("Smile!", 30, 30);
  }

}
- Save the file and name it MyApplet.java
(remember, the file name must match the class name!).
The title of the window changes to be the name of the file.

- We want to add MyApplet.java to our project. Since we created it in
Symantec Cafe, it knows about the file. Keeping the window in focus, we can
select the Project-->Add "MyApplet.java" option which will add the file to our project.

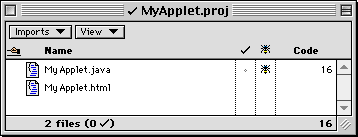
- Once the file is added to our project, we can bring the project up to date.

- To run an applet, we need a HTML file. We have a file called MyApplet.html
in our folder, but it has the wrong information in it. It is optional whether or not
the HTML files get added to the project. Doing so gives us easy access for modifying
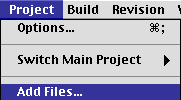
the file. Let's add the HTML file to our project. Since it's not open, we will need to
pick the Project-->Add Files... option.

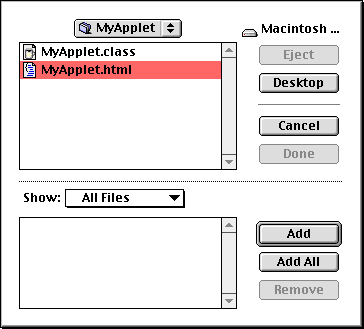
- Initially the window only shows .java and .class files. To view
HTML files, we will need to pick Show: All Files.

- We can add multiple files at once by selecting each file we want to add and
hitting the Add button. Do not add .class files to the project.

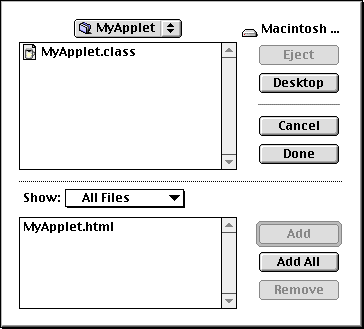
- Doing so moves the file to the bottom half of the window.

- Once we're done, hit Done and the files will be added to our project.

- Open up the file MyApplet.html and replace Your Class Name Here
with MyApplet. Save the file, then start AppletViewer and open the file.
If you've done everything right, you've just finished creating a working applet from scratch!
Task 2: Exploring Fonts and Colors
Now we have a working applet, we can practice drawing shapes in it.
We can also write text by using the drawString method as illustrated above.
To write in different colors, we must set the color of the graphics context
before writing each piece of text. We saw the Color contract earlier when
working with BuggleWorld. We used Java's Color class then so the same colors
are available to us now. The Color constants are listed below for your convenience.
We can also create other colors by using one of the Color constructors. See the
Color contract for details.
Color.black        Color.green       Color.red
Color.blue         Color.lightGray   Color.white
Color.cyan         Color.magenta     Color.yellow
Color.darkGray     Color.orange
Color.gray         Color.pink
Similarly, we can change the current Font
of the graphics context by using the setFont(Font f) method.
A Font object is created with three parameters specifying the font family,
style, and size.
- Valid family names are Helvetica, TimesRoman, Courier, Dialog, and DialogInput.
These are Java 1.0 names. Java 1.1 uses completely different names (i.e.
SansSerif, Serif, Monospaced, Dialog, DialogInput).
Family names are specified by a String with the family name.
- There are three constants that specify font styles. They are
Font.PLAIN,
Font.ITALIC, and Font.BOLD. To specify bold and italic
text, we say Font.BOLD + Font.ITALIC. This is possible because
the constants are defined as integer values.
- Size is measured in points, so 72 point text is 1 inch tall (roughly).
Some examples of how to specify and set fonts follow (assume g is a Graphics context):
Font f1 = new Font("Helvetica", Font.PLAIN, 18);

g.setFont(f1);

Font f2 = new Font("TimesRoman", Font.BOLD, 48);

g.setFont(f2);

g.setFont(new Font("Courier", Font.BOLD+Font.Italic, 36));
The FontMetrics class is used to measure the size of the
text. There are lots of details involved and you can read the FontMetrics
contract to learn more about it. For now, we'll tell you how to figure out
the width of a String (the most useful feature).
- First, we need to get an instance of a FontMetrics class for each
font we want to measure the size of. We ask the Graphics context for
a FontMetrics instance for a particular font using the getFontMetrics()
method. For example, given the fonts above,
we could do
FontMetrics fm1 = g.getFontMetrics(f1);
- Now we can ask the FontMetrics instance for the stringWidth of a particular String
int helloWidthInHelvetica = fm1.stringWidth("hello");
Knowing the width of Strings makes it possible to write Strings in multiple colors
or fonts next to each other precisely. We can practice using Fonts and Colors by adding
to the paint() method in the applet from Task 1.
Task 3: Bouncing Balls
In this problem we will create a Sprite which represents a bouncing ball that
bounces around the animation frame but stays within it. Step by step directions
are given below. To start this problem, open up the project inside the
AnimationLab folder which is in the lab11_programs folder available
on nike. This folder contains the minimum files necessary to run AnimationWorld.
If you want examples, download the AnimationLecture folder or read
the documentation. The Test folder
includes a working example of Task 3 and 4.
- Specifications:
- color
- size -- diameter of ball
- Starting position (top x and y coordinate of ball)
- initial horizontal and vertical rates
- Create the class file and instance variables. Name the class
BouncingBall. What variables will
we need for keeping track of the current state?
- Write a two constructor methods:
- default constructor method
- constructor method that specifies initial position, size, and color
call the default constructor by using the keyword this()
- Write a method that allows us to change the horizontal and vertical
rates. Name it setDxDy. Note that this could also be done via
a constructor method which takes those two pieces of information as parameters.
- Write the
drawState(Graphics g) method. This method should
draw the ball on the given graphics context.
- Write the
updateState() method. This method should do the
following:
- update the values of x and y
- check to see if out of bounds and adjust values if necessary. Use the
following algorithm:
if (x < 0) { // off the left edge
  x = 0; // set back in frame
  dx = -dx; // reverse horizontal direction
} else if ((x+size) > width) { // off the right edge
  x = width-size; // set back in frame
  dx = -dx; // reverse horizontal direction
}
// do similar thing for vertical direction
- Write the
resetState method.
- Write the
className, toString, and getState
methods if you want to.
- Test it out.
Task 4: Bouncing Balls which change color.
Extend your BouncingBall class from task 2 to change colors periodically.
- Add a static Color array instance variable (name it colors)
and initialize it with your favorite colors. What is the difference between
static and instance variables?
- Copy the following method into your class. What does it mean to be a
static method? How can we use this method in other classes?
Math.random is a function which returns a decimal number
between 0 and 1 (not including 1). We multiply those numbers by our desired
maximum value + 1, and then cast that result to an integer. This is a typical
way to generate random numbers from 0 to some maximum value. Can you
figure out how to generate random numbers from 10-15 inclusive?
public static Color getRandomColor () {
  int randomIndex = (int)(Math.random()*colors.length);
  return colors[randomIndex];
}
- Add instance variable for the "period" that the ball changes color.
In other words, how many frames should the ball stay the same color?
- Add a constructor method which takes in the new period information along
with all the other information. You will need to use super to call the
superclass constructor. Initialize the balls with a random color.
- Modify
updateState to change the color with each period. First call the
superclass version of updateState since we still want all that stuff
to happen. Use the method getStateNumber to figure out how many times updateState
has been called.
Use the modulus (%) operator to do the calculation. Remember that the modulus
operator gives us the remainder when we divide the first number by the
second number. For example, 5%2 is 1.
- We won't keep track of the initial color of the ball (since it's random
anyways) so there is no need to modify
resetState.
- Change the
className, toString, and getState
methods if you want to.
- Test it out.


