CS307: Texture Mapping 2: Texture Coordinates
Plan
- recap tripych
- Quiz Questions -- There were none!
- Exercise: A room with a view
- Texture coordinates
- Example: Add paintings on the walls
Exercise: Add a textured plane to the inside of a box
Exercise: A room with a view
To begin, save this room-view-start.html code file to your Desktop, along with these seaScape.jpg and rug.png images.
The starting code creates a THREE.BoxGeometry object that portrays
a room with the walls, floor, and ceiling having different colors. The materials
are THREE.MeshLambertMaterial and a single point source of light at
the center of the box lights up the room.
Your task is to use texture mapping to create the illusion of a window on the back wall and a rug on the floor:
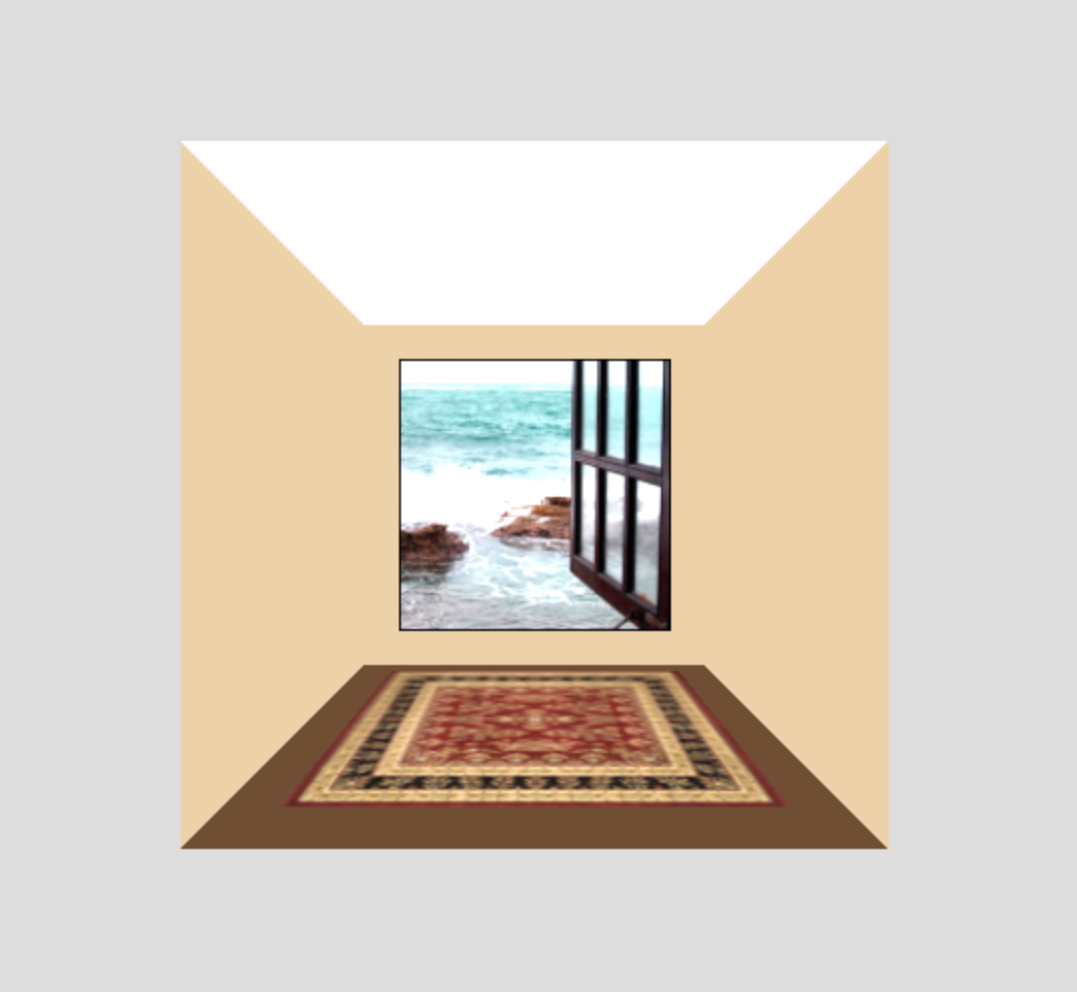
To complete this task:
- Add a call to
TW.loadTextures()to load the two images and provide an anonymous callback function that calls thedisplayRoom()function. - Complete the definition of the
displayRoom()function to create two texture-mapped planes that are added to the scene to create the appearance of a window at the back of the room and a rug on the floor. UseTHREE.MeshLambertMaterialfor the meshes. (More details are provided in comments in thedisplayRoom()function.)
Your solution might look like this room-view.html scene
Texture Coordinates
In the reading, you learned that a texture array is represented
conceptually using a coordinate system that ranges from 0 to 1
in the horizontal and vertical directions. We'll refer to the
coordinates as either (s,t) or (u,v):
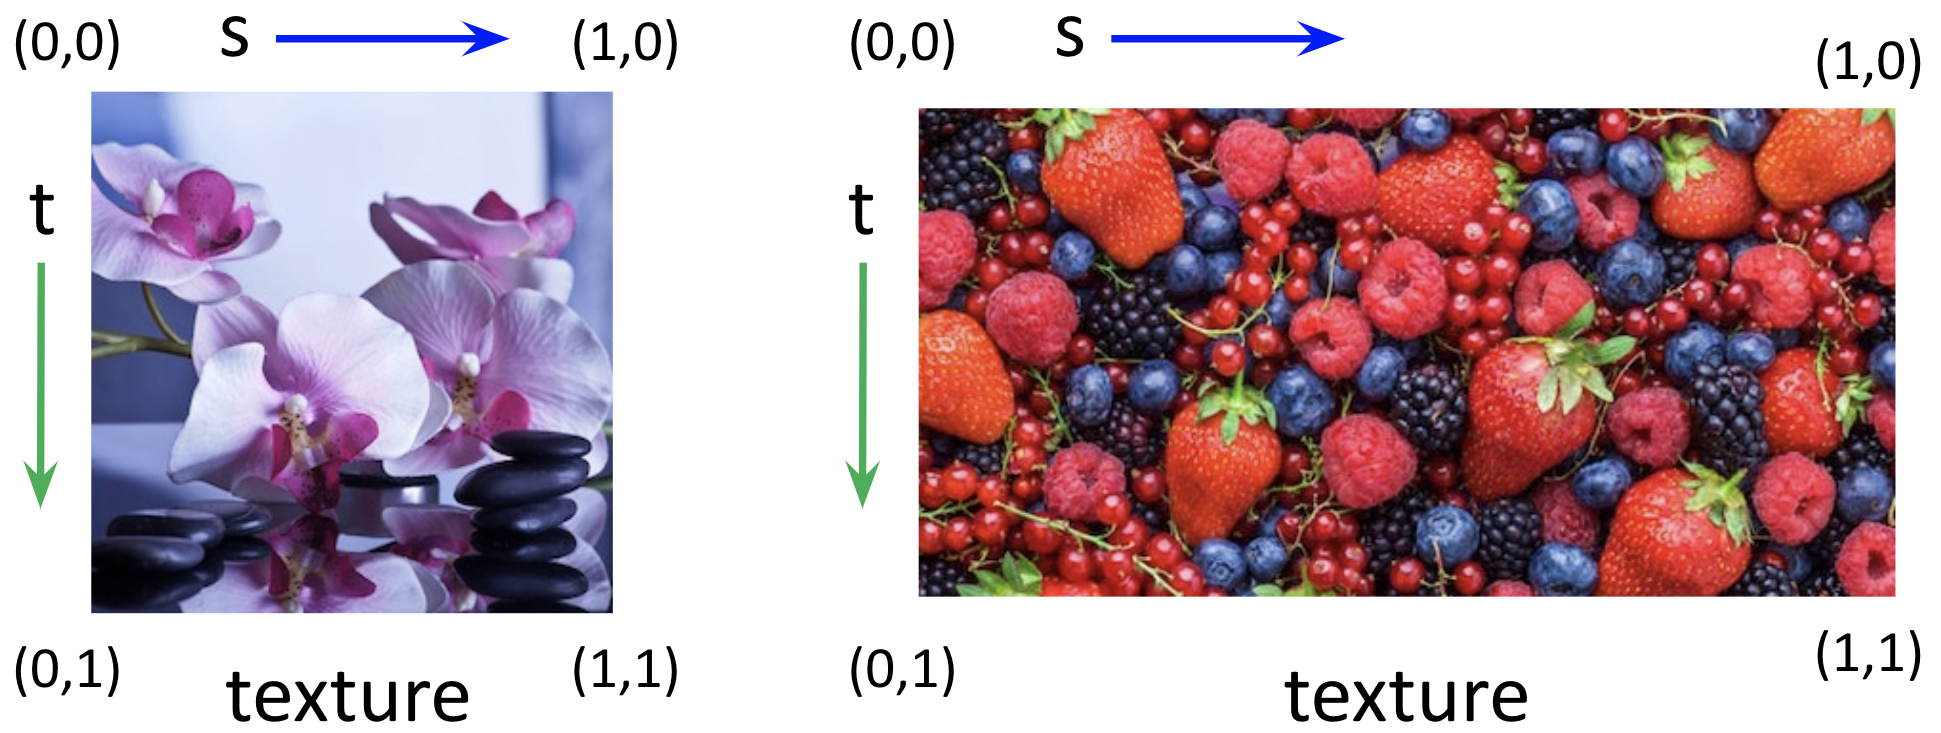
Regardless of the aspect ratio of the image dimensions, the
texture coordinates range from (0,0) in the upper
left corner to (1,1) in the lower right corner.
Three.js has a default strategy to map textures onto the triangle faces of built-in geometries. To add texture to objects we create from scratch, we need to specify a pair of texture coordinates for each vertex, for each face of the geometry.
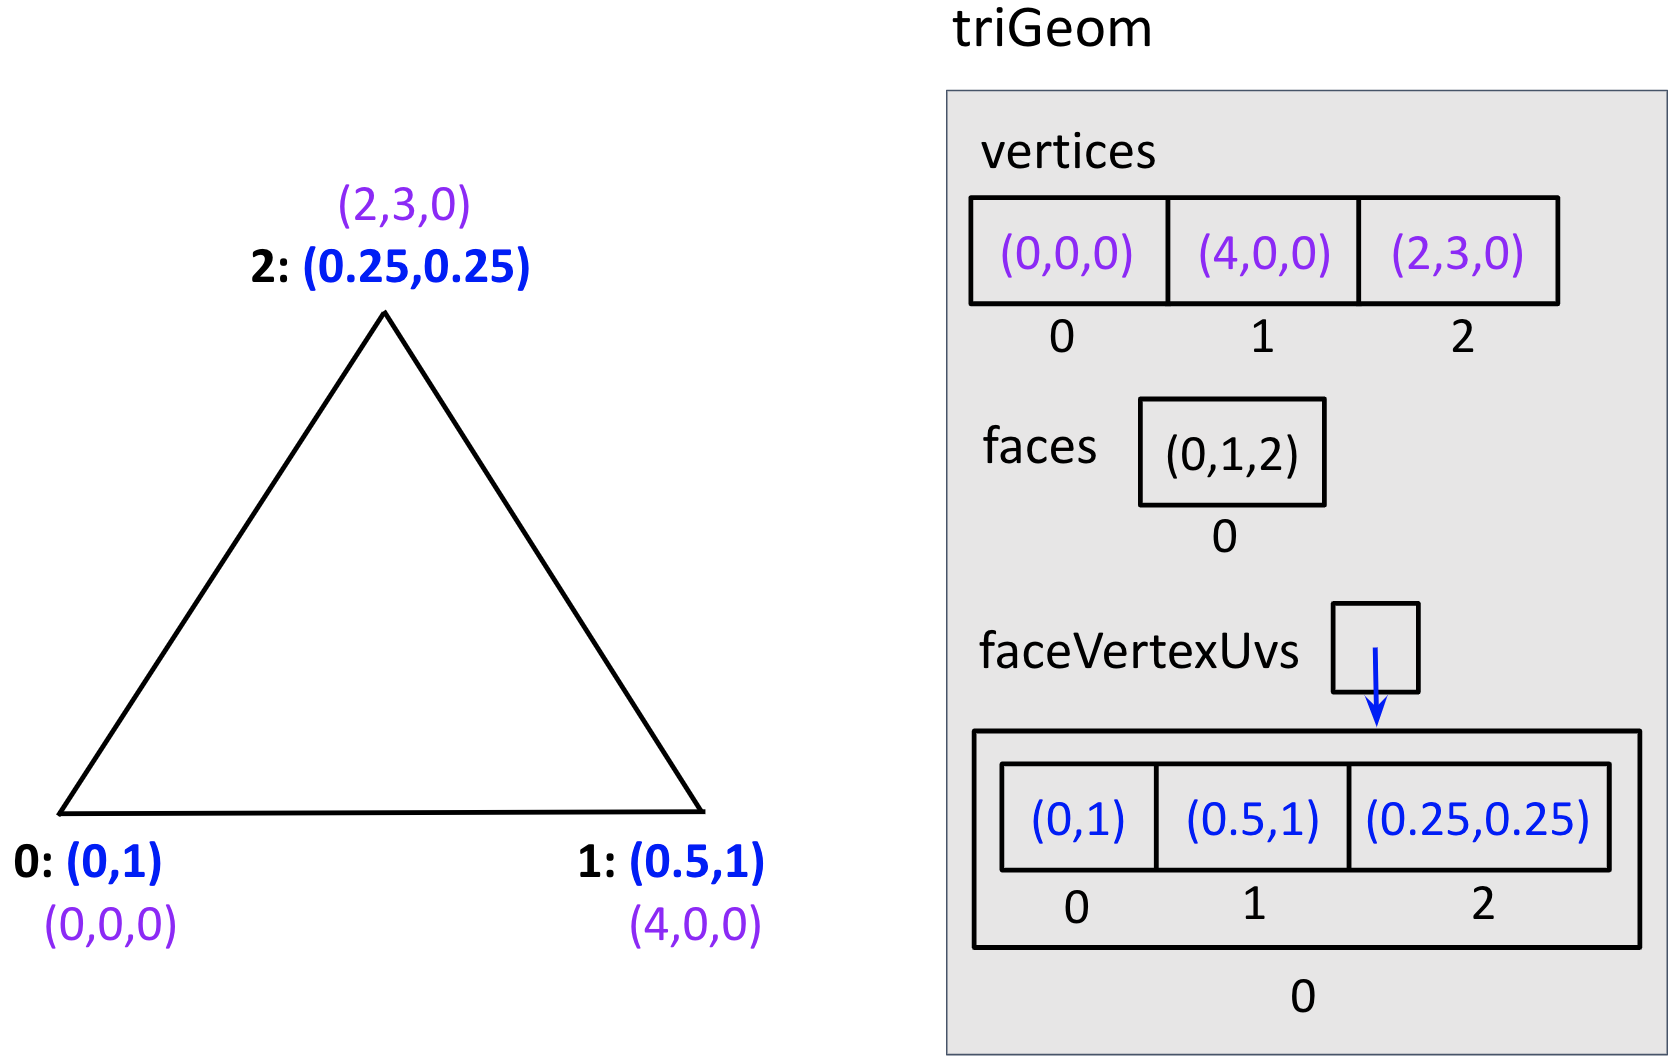
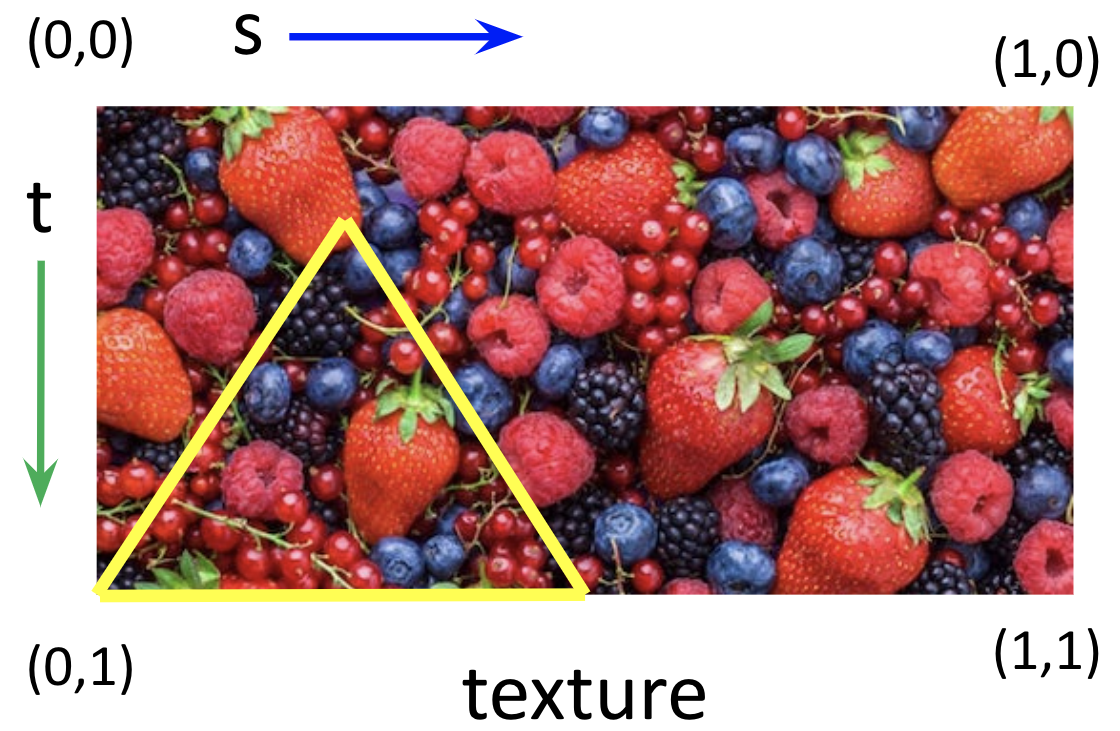
The readings had an example of the berries image texture-mapped onto an object with a single triangular face:
Recall how vertices and faces are stored in a THREE.Geometry object.
Texture coordinates for each vertex are stored inside an array that's
stored inside a one-element array stored in the faceVertexUvs
attribute in a THREE.Geometry object:
function displayTriangle (texture) {
    // create a geometry with one triangular face that has
    // the berries image mapped onto this face
    var triGeom = new THREE.Geometry();
    triGeom.vertices.push(new THREE.Vector3(0,0,0));
    triGeom.vertices.push(new THREE.Vector3(4,0,0));
    triGeom.vertices.push(new THREE.Vector3(2,3,0));
    triGeom.faces.push(new THREE.Face3(0,1,2));

    // add a 3-element array of THREE.Vector2 objects
    // representing texture coordinates for the three
    // vertices of the face
    var uvs = [];
    uvs.push([new THREE.Vector2(0,1),
              new THREE.Vector2(0.5,1),
              new THREE.Vector2(0.25,0.25)]);
    // assign the faceVertexUvs property to an array
    // containing the uvs array inside
    triGeom.faceVertexUvs = [uvs];
    // by default, Three.js flips images upside-down, so
    // you may want to set the flipY property to false
    texture.flipY = false;

    var triMat = new THREE.MeshBasicMaterial({color: 0xffffff,
                                              map: texture});
    var triMesh = new THREE.Mesh(triGeom, triMat);
    scene.add(triMesh);
    TW.render();    // render the scene
}
The above process for specifying the texture coordinates for a geometry that's made from scratch may seem tedious, and this example had only one face!
Let's examine the code for a version of the room with paintings on the left and right walls: room-art.html
The original painting is on the right wall, and a jumbled version is on the left wall. The diagram below will help us understand how the texture coordinates are set to create the jumbled painting.
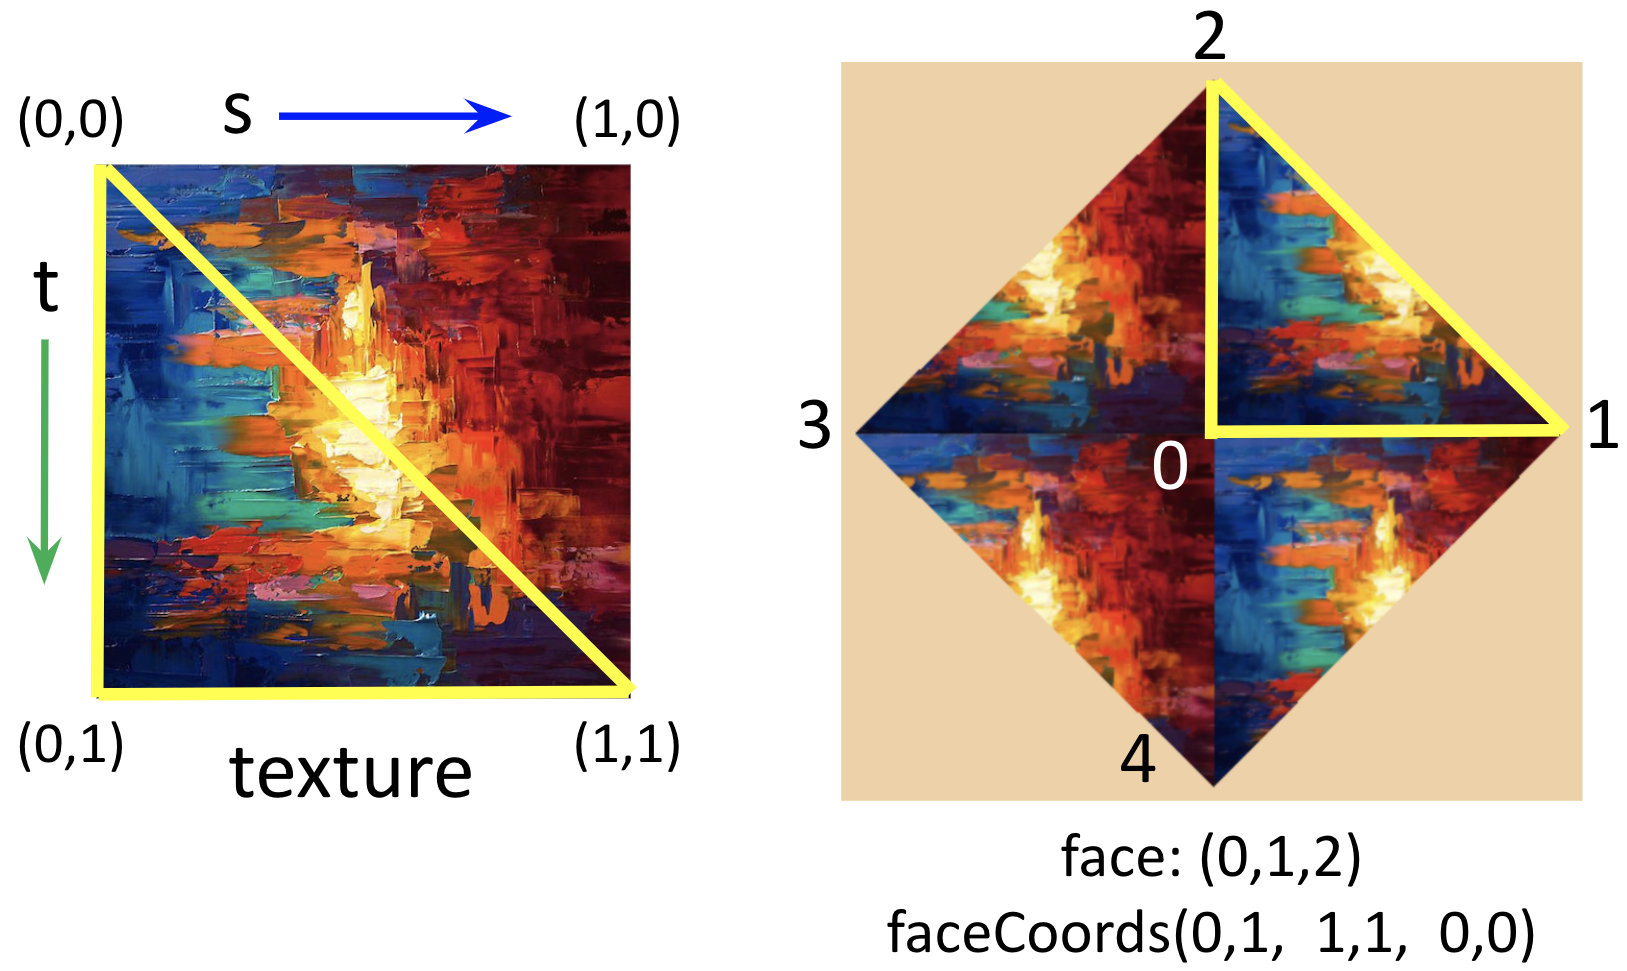
The key function is addTextureCoords(), which you
can use as a starting point for setting texture
coordinates for other geometries that you create
from scratch:
function addTextureCoords (artGeom) {
   var UVs = [];           // array of face descriptors

   function faceCoords(as,at, bs,bt, cs,ct) {
      // adds the texture coordinates for a single face to the UVs array
      UVs.push( [new THREE.Vector2(as,at),
                 new THREE.Vector2(bs,bt),
                 new THREE.Vector2(cs,ct)] );
   }

   // set up texture coordinates for the four faces, in the order
   // they were originally added to the geometry
   faceCoords(0,1, 1,1, 0,0);
   faceCoords(1,1, 1,0, 0,1);
   faceCoords(1,0, 0,0, 1,1);
   faceCoords(0,0, 0,1, 1,0);

   // attach the UVs array to artGeom
   artGeom.faceVertexUvs = [ UVs ];
}
Preparation for Next Time
Next time, we'll talk about repeating image textures and mapping textures onto curved 3D surfaces. To prepare, continue reading the material on Texture Mapping:
- Reading for Tuesday: Texture Mapping