Reading: Texture Mapping
Texture mapping was one of the major innovations in CG in the 1990s. It allows us to add a lot of surface detail without adding a lot of geometric primitives (lines, vertices, faces). See how interesting Caroline's "loadedDemo" is with all the texture-mapping.


In this reading, we'll begin with mapping a single image onto a plane, and then map multiple images onto the sides of a cube. We'll then take a short detour to learn how to deal with an issue known as Cross-Origin Resource Sharing (CORS) that arises when accessing images hosted on a different domain. Returning to texture mapping, we'll introduce the important concept of texture coordinates before moving on to the creation of repetitive texture patterns, mapping textures onto curved surfaces, and combining texture with other properties of surface material like color and reflectance.
Simple Image Mappings
Texture mapping paints a picture onto a polygon. Although the name is texture-mapping, the general approach simply takes an array of pixels (referred to as texels when used as a texture) and paints them onto the surface. An array of pixels is just a picture, which might be a texture like cloth or brick or grass, or it could be a picture of Homer Simpson. It might be something your program computes and uses, but more likely, it will be something that you load from an image file, such as a JPEG.
Consider this example of a floral scene mapped onto a plane:
Here is the full code, with comments removed:
function displayPlane (texture) {
    var planeGeom = new THREE.PlaneGeometry(10,10);
    var planeMat = new THREE.MeshBasicMaterial({color: 0xffffff,
                                                map: texture});
    var planeMesh = new THREE.Mesh(planeGeom, planeMat);
    scene.add(planeMesh);
    TW.render();
}

var scene = new THREE.Scene();
var renderer = new THREE.WebGLRenderer();
TW.mainInit(renderer,scene);
var state = TW.cameraSetup(renderer,
                           scene,
                           {minx: -5, maxx: 5,
                            miny: -5, maxy: 5,
                            minz: 0, maxz: 1});

var loader = new THREE.TextureLoader();
loader.load("flower0.jpg",
            function (texture) {
               displayPlane(texture);
            } );
A
THREE.TextureLoader() object is used to load an image
texture. The load() method loads
the image with the specified URL (the flower0.jpg image is stored in
the same folder as the code file), and when the image load is complete,
this method invokes the callback function provided, with the
texture as input. The specified function is an
anonymous function in this case, and simply invokes the
displayPlane() function with the loaded texture.
The load() method uses an event handler that waits for
an onLoad event indicating the completion of the
image load, before invoking the given function.
Why is this necessary? It takes time to load images, and if the
code to render the scene were executed immediately after initiating the
image load, the scene could be rendered before the image
is done loading. As a consequence, the image texture would not appear
on object surfaces in the graphics display.
The displayPlane() function creates a plane geometry and a
material whose map property is assigned to the input texture.
After creating a mesh and adding it to the scene, the TW.render()
function is invoked to render the scene.
Suppose you want to use multiple image textures in your scene? The TW
package provides a handy shortcut, TW.loadTextures() that loads
multiple images, creates a texture for each one and stores the textures
in an array. A callback function is also supplied that is invoked after
all the images are loaded. This callback function is assumed to have an
input that is the array of textures.
This demo maps three floral images onto the six sides of a cube:
Use your mouse to move the camera around to view all the sides of the cube. The
following code shows the TW.loadTextures()
function in action:
TW.loadTextures(["flower0.jpg", "flower1.jpg", "flower2.jpg"],
            function (textures) {
                displayBox(textures);
            } );
The first input is an array of file names for the multiple images.
Here is the code for the displayBox() function:
function displayBox (textures) {
    // box geometry with three floral images texture-mapped onto sides
    var boxGeom = new THREE.BoxGeometry(10,10,10);
    // palette of possible textures to use for sides
    var materials = [new THREE.MeshBasicMaterial({color: 0xffffff,
                                                  map: textures[0]}),
                     new THREE.MeshBasicMaterial({color: 0xffffff,
                                                  map: textures[1]}),
                     new THREE.MeshBasicMaterial({color: 0xffffff,
                                                  map: textures[2]})
                    ];
    // array of 6 materials for the 6 sides of the box
    var boxMaterials = [materials[0], materials[0], materials[1],
                        materials[1], materials[2], materials[2]];
    var boxMesh = new THREE.Mesh(boxGeom, boxMaterials);
    scene.add(boxMesh);
    TW.render();    // render the scene
}
In this case, a "palette" (array) of three materials is first
created, and then an array of six materials is constructed for
the six faces of the cube (it takes some trial-and-error to
determine the order in which the six faces are stored in the
box geometry, in order to achieve a desired arrangement of
the three image textures). Again, the scene is not rendered
until the images are all loaded and the displayBox()
function is invoked.
Asynchronous Programming
The previous section had some new programming techniques, namely a callback function that executes after an image is loaded. This is kind of programming that deals with asynchronous events, so we'll call it asynchronous programming.
JavaScript has some (relatively) new features to support asynchronous programming. We will discuss those in class. Meanwhile, consider the following demo, which has 3 different boxes (cubes), with different versions bound to different keyboard callbacks.
Press the following keys to get different boxes:
- A box with faces on each side.
- A box with the same UV grid image on each side. We'll use this a lot when talking about texture coordinates, next time.
- A box with die faces on each side, which helps to understand how the faces are numbered.
The code to produce a texture box looks like this:
// box geometry with different texture on each side
// async; returns a promise. Must use with await

export async function box6 (geom, filenameArray) {
    const loader = new THREE.TextureLoader();
    const promises = filenameArray.map(a => loader.loadAsync(a));
    const textures = await Promise.all(promises);
    console.log('all textures loaded', textures);
    // palette of possible textures to use for sides
    const materials = textures
          .map( t => new THREE.MeshBasicMaterial({color: 0xffffff, map: t}));
    var boxMesh = new THREE.Mesh(geom, materials);
    return boxMesh;
}
There are some very new things in that code:
- The
asynckeyword, which says this is an asynchronous function, which means that the execution of the function may be suspended while some I/O completes. - The
promisesarray, which contains objects called promises, each of which represents an unfinished, asynchronous operation. In this case, an I/O operation, that was begun byloader.load(filename), but is not yet complete. - The
awaitkeyword can be used to wait until a promise is fulfilled, which in this case, means that the I/O completes. To "wait" means that the function is suspended, allowing the computer to do other things. (It might build other parts of our scene.) Promise.allwhich collects a bunch of promises into a single promise, that is fulfilled when all of the promises in the array are fulfilled.
Collectively, the code above allows the box6 function
to load 6 images, in parallel, and, when they are all loaded, build a
box and return it. We'll discuss this more in class.
Loading Images and CORS
Here's a demo that is virtually identical to the example of the floral image mapped onto a plane, using the image of a cute Ragdoll kitten instead:
Sadly, you're not able to see the cute kitten in the demo, so I'll show you the image here, downloaded from the Wikipedia kitten page:

If you load the kitten demo with the JavaScript Console open, you'll
see an error that includes the phrase, ... has been blocked
by CORS policy .... This is the
Same-Origin
Policy, a security policy in web browsers. As stated on this Wikipedia
page:
Under the policy, a web browser permits scripts contained in a first web page to access data in a second web page, but only if both web pages have the same origin. An origin is defined as a combination of URI scheme, host name, and port number. This policy prevents a malicious script on one page from obtaining access to sensitive data on another web page through that page's Document Object Model.
This policy covers XMLHttpRequests (Ajax requests) as well, which is where JavaScript code issues the request for the resource. So, even though the browser can request the image from the kitten Wikipedia page, our JavaScript code can't.
A solution is CORS:
If the site we are loading an image from allows CORS, we should be able to do so by adding an extra header to the request, using the following:
THREE.ImageUtils.crossOrigin = "anonymous";  // or
THREE.ImageUtils.crossOrigin = "";           // the default
However, Wikipedia doesn't allow CORS, so we can't load from there. In general, the server has to permit CORS. What this means for you is that
Your images need to be on the same computer as your JavaScript program.
If you download an image from the web that you use in your code, it would be good to include a comment in the code file with the source.
Aspect Ratio
An image has a natural aspect ratio, which is the width divided by the height. If you force it into a different ratio, the results will look distorted. Here are two images: the one on the left is allowed to be its natural dimensions (300x220 or an aspect ratio of 1.36). The one on the right is forced to be square, 220x220:


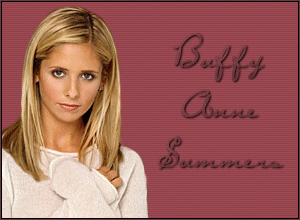
Similarly, if the image is not the same aspect ratio as the rectangle it's being texture-mapped onto, there can be distortion. In the following demo, we map the 300x220 image of Buffy onto a square plane.
In general, if the aspect ratios of your image and object surface are different (e.g. you map a square image onto an oblong plane), the image will be distorted along one of the dimensions. We'll return to this idea in the context of texture coordinates later.
Summary
Here are the key ideas on texture mapping:
- At its most basic level, a texture is an array of pixels, similar to an image
- When loading an image to use for texture mapping, we need to consider that it takes a non-negligible amount of time for the image to load, so we need to write event handlers for the after load event that render the scene after all images are loaded. Or we have to use async/await and promises.
- When accessing images hosted on a different domain, our JavaScript code
bumps up against the Same-Origin Policy. When loading images
from a local machine, we can start up a web server using Python's
SimpleHTTPServermodule.