Javascript User Defined Functions
The goal of this assignment is to practice your JS skills, as well as put together HTML, CSS, and JS in one page. Specifically, you will get practice with:
- reading from input elements on the web page
- writing on the web page
- defining functions with and without parameters
- adding of a responsive button on a web page
- use the click event to trigger the call of a function
Set up and preparation
From your download directory, get the folder named
hw05. It contains materials you will use for this
assignment. Open the .html and .js files provided to examine the code,
in your editor. Load the html documents on your browser, and see how
they look.
Note: For completing this assignment, you do not need to, and you should not edit the provided HTML or CSS documents. Write your js code in the js files. You will need to look at the html code to identify the IDs of a couple of elements to use in your js code.
Reading values from inputs
As a reminder here is how you can read the value from a text input with id "input1Id":
document.getElementById("input1Id").value;
Task 1: Calculator
For this task, you will create a simple calculator that performs addition, subtraction, multiplication, and division.
Open the file calculator.html in your browser
to see what your calculator will look like.
Upon clicking the Calculate!
button, your program should prompt the user for
a number, an operator (+, -, *, or /), and another number.
It should then print the input and answer on the calculator
screen
as shown in the examples.
Now open the files calculator.html, calculator.css,
and calculator.js in Atom and take a look at them.
Important:
For this task, you will NOT need to edit the HTML or CSS at all.
We have also provided three functions in the calculator.js file.
You will only need to fill in the code in the code blocks for these three functions.
We have already set up the button on the page to call the function promptUser().
To see this, try adding adding an alert() to the code block of
promptUser() and note that when you press the button, it triggers the alert.
The expections for each of the three functions you must define are outlined below. You may find it easiest to work on one function at a time, checking your progress as you go by printing to the console.
promptUser()
The promptUser() function should first give the user three separate prompts
for the first number, operator, and second number, respectively.
The three separate prompt() calls to get the user input should be (in this order):
- "Enter first number: "
- "Enter operator (+, -, *, or /): "
- "Enter second number: "
calc(x, operator, y) function to get the answer.
Finally, it should call the printAnswer(x, operator, y, answer) function
to print the answer to the page.
calc(x, operator, y)
The calc(x, operator, y) function takes the two numbers
and operator as input and returns the answer.
The parameters x and y should be the first
and second numbers, respectively.
The parameter operator is whatever operator the user entered.
E.g., if the user enters "3", "+", and "5" (without the quotes),
then this function should return "8".
Input assumptions:
You can assume the user gives you valid numbers for the two numbers.
However, they may enter anything for the operator.
If the operator they enter is not +, -, *, or /,
then this function should return NaN
(the javascript object NaN, not the string "NaN").
printAnswer(x, operator, y, answer)
The p>rintAnswer(x, operator, y, answer) function
takes the two numbers, operator, and answer as input.
It print the full equation to the page by
adding it in a paragraph (<p>) to the element with
id="calculatorDisplay".
Note that to add a string to the end without replacing what's currently there,
you use += instead of =.
For example, executing the following line of code would add "5 * 2 = 10":
document.getElementById("calculatorDisplay").innerHTML += "<p>5 * 2 = 10</p>";
If the answer, is NaN the paragraph element added should
belong to the class badInput.
This will cause the text to display in red.
You can check whether the answer is NaN using the existing
function isNaN().
You can
learn more about isNaN() here.
Note that this function should not return anything.
It simply adds another line to the display.
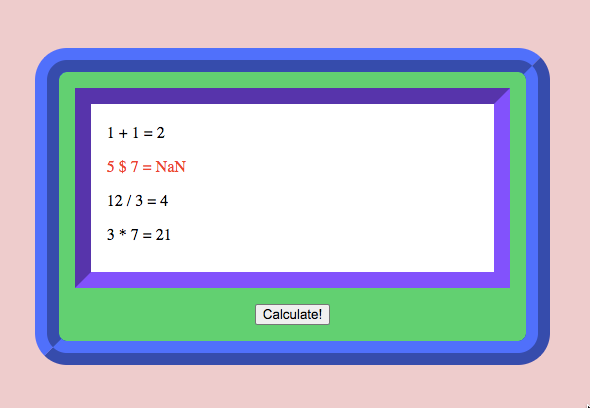
The HTML file, calculator.html, starts with a few lines displayed
in the calculator to illustrate what the output should look like.
Your p>rintAnswer(x, operator, y, answer) function should
NOT replace the existing text.
It should just add a new line each time.
After adding a few lines, the CSS will automatically add a scroll bar to
scroll down to the most recent line.
The following picture shows what should display if the first query is
3, *, 7.
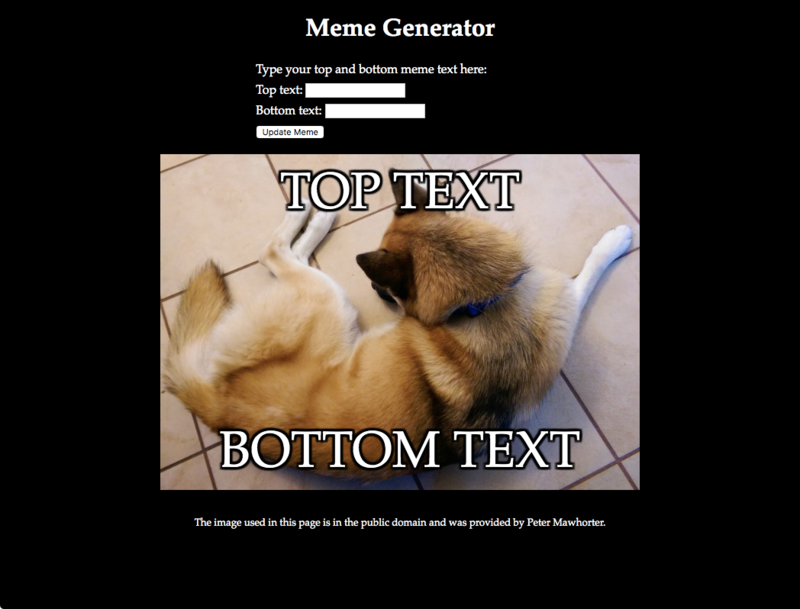
Task 2: Meme Generator
For this task, you will write a meme generator, which will allow the user to create a custom meme (i.e., an image with some text on it). Here is an example of what it should look like (right-click and select "Open image in new tab" to view details):

Here's another example of a meme using a custom image; this shows only the meme part:

Look at the provided file memes.html, and see which js and CSS
files it links to. Also note which elements have ID values and what those IDs
are. In particular, we want to be able to change the value of the top and
bottom meme text, and we want to do that by using the values of the text
inputs.
For this task, you will be writing two JavaScript functions: one to handle updating the text, and another function to change the font size based on how much text there is.
Note: if you want, you may find a different image to use for your meme generator and update the HTML page to use that image. However, in that case you must also update both the alt text and the attribution text at the bottom of the page to accurately reflect how you are using the image. You should credit the original creator of the image if you can, and if it is a copyrighted image, you should state that you are using it under "fair use." Do not use an image counter to its creator's wishes.
Task 2A: updateMemeText() function
You need to create the memes.js file, and write your code in it.
To start with write the function updateMemeText(), which does not
accept any arguments. This function should read the text values from the text
inputs on the page, and update the innerHTML of the top and bottom
text spans to match the input values, similar to what you did in the previous
task. Once this is done, you should be able to click the "Update Meme" button
and see the meme text change.
Remember that if things aren't working, you should check the console for any error messages.
Task 2B: fontSizeForText() function
Now that the meme generator is working, we'd like to do one more thing: change the font size depending on how much text the user enters. That way, even if they type a lot of text, it will still be able to fit on the image. To test this, try copying this paragraph of text and using it as the top text for the meme. You'll see that it is much too long, and runs over the whole picture and further down the page.
Your job is to build a function fontSizeForText(text). This
function will accept one argument, which should be a piece of text (a string). It will measure the length of the text, using:
var len = text.length;and then it will do the following:
- If the length is 40 or less, it should return the number 50, which is the default font size (it should return a number, not a string).
-
If the length is between 40 and 100 characters, it should return a number
between 50 and 30, depending on the length of the string.
Specifically, the closer to 100 characters in the text, the smaller the result should be. You can use a mathematical formula to compute how close to 40 or 100 the length is (as a number between 0 and 1), and then another formula to convert this number into a font size. Make sure to useMath.floorat the end so that your result is an integer (and test this in the console). - If the text length is more than 100, it should return 30 (the minimum font size).
This text is exactly 30 chars.

This text is exactly 40 characters long.

Fifty characters is 1/6 of the way from 40 to 100.

This text is 70 characters long, which is half-way between 40 and 100.

This text is exactly 97 characters long, which is long enough to be almost the minimum font size.

This text is exactly 116 characters long, which is long enough that it should definitely have the minimum font size.
Once you are done with your fontSizeForText function and you have
tested it, you must modify your updateMemeText function so that it
uses fontSizeForText to compute the font size for the top and
bottom texts separately, and then in addition to updating the text of each
<span>, it should update their font size as well.
Note that when updating font size, you can use
element.style.fontSize = number + "pt" if you have an HTML element
to update stored in a variable element, and a numerical font size
stored in a variable number. This won't always work if the number
is not an integer though!
Bonus Task (no credit)
If you feel comfortable with the JavaScript code so far and want to go further on your own, try to add a drop-down selector to the page so that the user can choose from one of several images to use. Make sure you include attributions for all images if you do this.Submission
Your folder should contain the following files:
calculator.htmlcalculator.csscalculator.jsmemes.htmlmemes.jsmemes.cssdijkstra.jpg
public_html/cs115-assignments folder on your cs account.
Permissions have been set so that only you and the instructors/graders can
see your files there.
Finally, after you have uploaded your work, use the following URLs to access your files and make sure they work approrriately when accessed from the server.
http://cs.wellesley.edu/~yourname/cs115-assignments/hw05/calculator.htmlWhen prompted for login credentials, enter your user name and password for your cs account.
http://cs.wellesley.edu/~yourname/cs115-assignments/hw05/memes.html
Due Date/Time
Check the schedule for the due date. The class's Late Policy applies here. Remember that you should not modify turned in work after the due time has passed, so that when we grade it, it's not time-stamped late.
- Folders and files have the required names and are uploaded to the proper location.
- Your files have comments at the top and as necessary interspersed in the code.
- You have not modified the original HTML pages.
- Correctness and quality of the js and CSS code.