Welcome to Java and BuggleWorld
Total checkmarks:What we'll cover today:
- Accessing the CS111 Google Group
- Download and Upload files using Fetch (WinSCP details here)
- Introduction to DrJava
- Buggles and BuggleWorld
- Write, Compile, Run and Debug Simple Programs
-
Accessing the CS111 Google Group
The CS111 Google group will be an important place for announcements and communication for students in the course. This describes how to find it. When you are logged into your Wellesley gmail account, look for the Groups menu item, indicated by the red arrow below:
After you click on Groups, type "CS111 Fall2012" (without the quotes) in the search box. The spacing is important.
Click on CS111 Fall2012 to access our Google group for this semester, and your screen will look like this:

Here you'll find all the readings for the semester. To post a message to this group, use this email address:
cs111-fall12@wellesley.edu.
Downloading and Uploading
Use Fetch to connect to your own account in puma. Navigate around to start becoming familiar with the structure of it. Disconnect.Connect to puma again, using the cs111d (download) account. You'll need the password given in lab. Locate and look at your own
drop directory.
Locate the lab1_programs sub-directory, within the
download directory. Download lab1_programs
into your local computer's desktop. Click your mouse in the name until the cursor changes so that you can edit the folder name. Change the name of the folder so
that it contains your name, like this:
| OLD | NEW |
 |  |
Directions for using Fetch are available here. For documentation using WinSCP on a PC, click here.
Editing and compiling Java programs in DrJava
- Meet DrJava (its icon looks like this:
 )
)
DrJava is the program we will be using in this course to edit, compile and run our Java programs. Java programs are written in files that end in.java. DrJava can take our Java programs and compile them. Compiling a Java program converts Java code into something called bytecodes which can then be understood by the computer. Bytecodes are stored in files that end in.class. Don't worry, you'll see examples of all this in a few minutes. - To find DrJava, go to the
"Go" menu at the top of the screen and select "Applications". A
window should open with a folder called DrJava. Open the DrJava folder, and you can now start DrJava
by double-clicking on the icon.
To start DrJava, double-click on the DrJava icon.

- Once you start DrJava, a window should open with 3 panes.
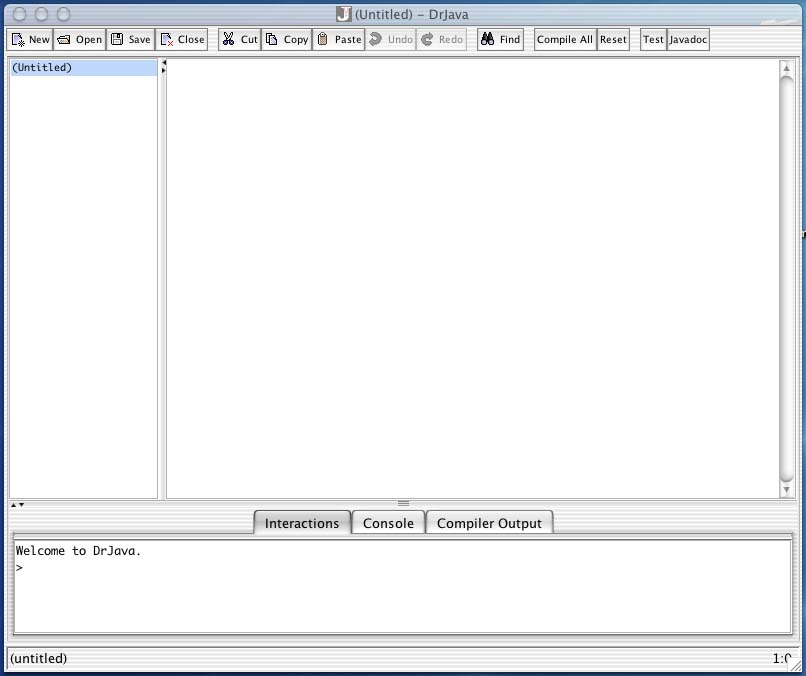
You can resize the window by pulling on down its lower right corner. The pane at the bottom of the window is called the interactions pane (it should have a message saying "Welcome to DrJava.") The pane on the left of the window is called the Documents pane. When you are editing Java files, the name of the file (or document) will appear in this pane. Finally, the pane on the right is called the Definitions pane or Editing pane. This is where contents of files will appear (i.e., the Java code in a file).
- Now let's open our first Java file. Click on the button labeled "Open" in the toolbar at the top of the window.
Important Note: Always start DrJava and open your java file from within it, to get into Java programming. If you try to open a
javafile by double-clicking on it, you will end up in a TextEdit program, rather than in DrJava.Now find the folder
lab1_programson your desktop, and open the fileBuggleWorld.javafrom within DrJava.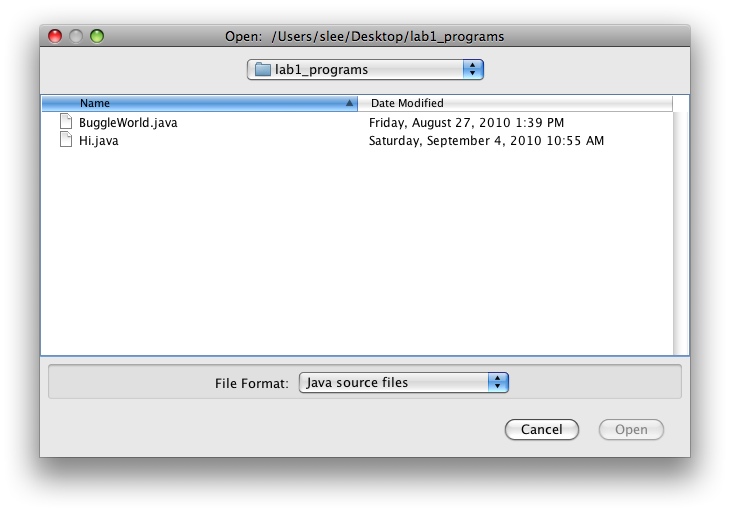
The Editing pane should now contain Java code (like below):
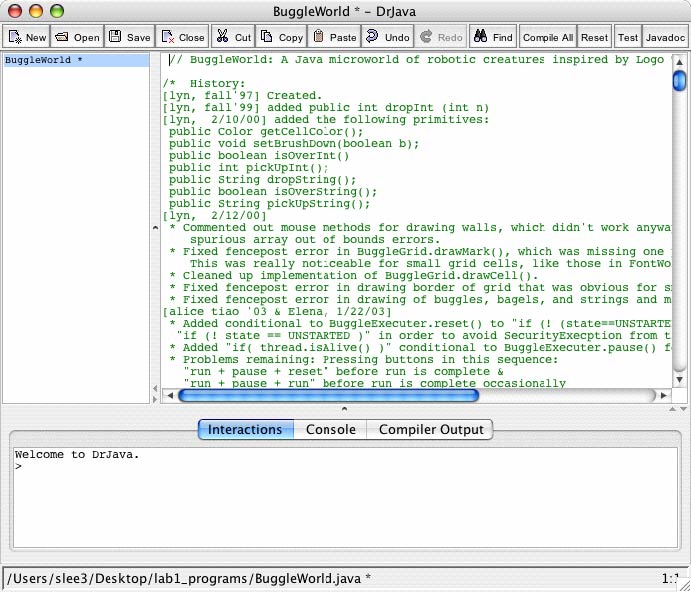
- Before we can run this Java program to see what it does, we first
need to compile it.
To compile the program with DrJava, click Compile.
Alternatively, hold down the shift on your keyboard and press the key F5. When the program is finished compiling, you should see a message in the bottom pane saying "Compilation completed."You may see, as output of the compiler, a sequence of "Deprecated Warnings" and "Unchecked Warnings". You shouldn't worry about them, but if you prefer to hide them altogether, you can do so. Go to:
DrJava -> Preferences --> Compiler Options
and uncheck the appropriate checkboxes.If you look in the folder
lab1_programsthat you downloaded earlier, you should now see some new files in the folder:classfiles. These are the results of the compilation you just performed. - Now it is time to run the executable program. The program will be interpreted and executed (i.e. run) by the
Java Virtual Machine.
Just click the Run button in DrJava, to run the program as an application.
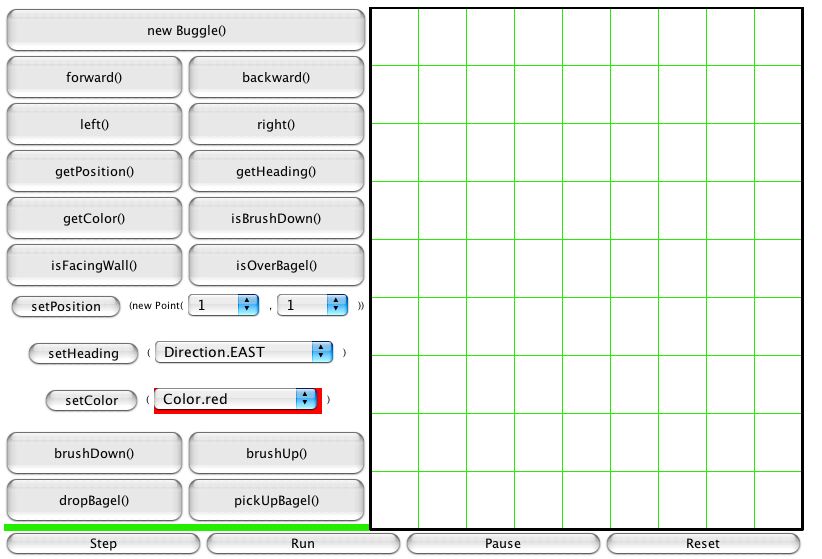
Here's a quick summary of the most important buttons:
 | runs a program in BuggleWorld | |
 | puts BuggleWorld back to its initial state Reset must be hit before you can Run a program again. | |
 | Each press of Step executes (roughly) one line of the program. Step can not be used if the program has been Run unless BuggleWorld is Reset. |
- Task 1: Write down the sequence of buttons which must be pressed to get "Hi" as shown below.
-
Task 2: Open the
Hi.javajava program from within DrJava. Study the code. Compare its steps with the sequence of steps that you have come up with to say "Hi". Is it the same steps? Compile and then Run this program, from within DrJava. You should see a new window, looking like this: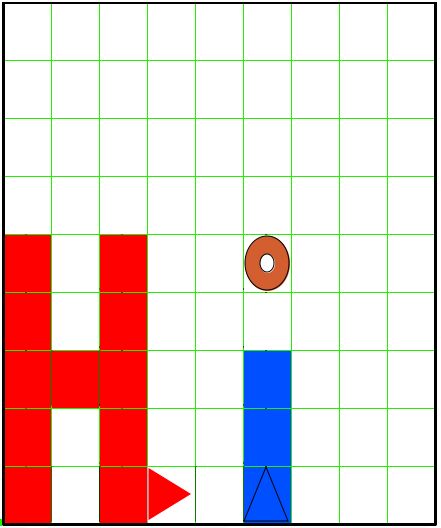
Exercise 1. Jumping into CS
Now you're all ready to write your first BuggleWorld program! The goal is to write "CS" as shown below.
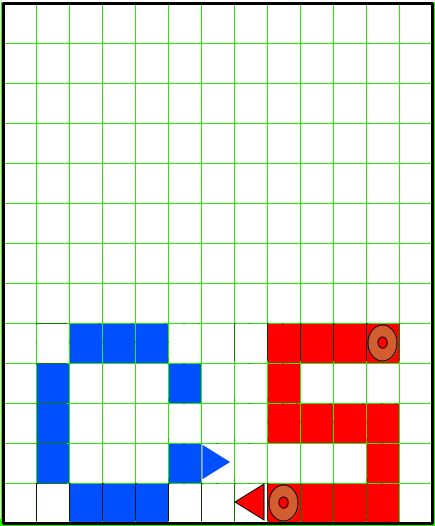
We will create our own java file from scratch!
Let's call our file Cs.java.
We'll use Hi.java as a guide to creating our new file.
Step 1: Create
Cs.javaby clicking on New in DrJava.- Add in the public class definition called
Cs(no code yet, just the class definition) - Add in a comment at the top with your name and date
- Add in the import statement at the top of the file, as you see in
Hi.java - Add in the
setup()method fromHi.javafile but change thesetDimensions(9,9)so that you get a bigger, grid to work with. - Add in the
main()method, as you see inHi.java, updating it only with the name of our class ("Cs" instead of "Hi").
- Add in the public class definition called
-
Step 2: Compile the program
Cs.javain DrJava. - Step 3: Run the program from within DrJava. You should see a new window poping up, titled
"Cs", with the appropriate grid on it. But pressing on the buttons on it will cause no action
(i.e. nothing is written and no buggles are created). This is because
we have not added the appropriate code in
Cs.javayet. -
Step 4: Edit your program, by adding a few commands to it.
Save and repeat steps 2 & 3, several times, until your program works as specified.You may make some mistakes in the syntax of your Java program, perhaps leaving out a semi-colon or misspelling something. When compiling, DrJava will usually point out a line where it thinks the error is. Often it will be right, but often you will have to hunt for it. Don't worry and get discouraged. Everyone makes lots of errors, and interpreting error messages is a real skill. But fixing all the bugs just makes success sweeter.
Exercise 2. Draw the
BuggleWorld flag
Now, write a new program called
Flag.java to draw the BuggleWorld flag as shown below.
Some useful things to note:
- This program will go in a new file called
Flag.java(note the capital F) in yourlab1_programsfolder - The grid below is 15x15 cells
- You must use exactly 4 different buggles to draw the flag, as specified below:
- One buggle draws the red flagpole
(note the ending position at the flagpole base) - One buggle draws the blue stripes on the flag
(note blue buggle ending position on lower blue stripe) - One buggle draws the yellow stripes on the flag
(note yellow buggle ending position on lower yellow stripe) - One buggle draws the green "stars" on the flag
(note green buggle ending position on lower left "star")
- One buggle draws the red flagpole

At the end of lab
Save your work by uploading to your account in puma, using Fetch. You may want to use this work later as a reference. From there you can download your files to your home computer, or an other device, like a memory stick. Your programs will stay on puma until the end of the semester.Then, please make sure to delete your files from the local computer, empty the trash (click on the blue background of your Mac, then Finder -> Empty Trash) and log out!