Exercise 1: JEM
Draw JEM for the following example:

Exercise 2: Welcome to ChecksWorld!!!
Open ChecksSimple.java in DrJava.
What picture does ChecksSimple.java produce?
Run the program to see the answer.
Click here for the answer
For all the Checkerboard tasks below, you will be creating new java files from scratch.
Task 1 -- Drawing a pattern using Methods
The goal of this task is to write a java program to draw the simple check you just show.
In DrJava, create a new file called MyChecksSimple.java. Save it in
your lab2_programs folder.
-
MyChecksSimple.java must define the class called MyChecksSimple
(like you defined the Cs class last week in the file Cs.java)
-
MyChecksSimple should contain a run() method,
as well as the setup() method.
If you need, take a look at Hi.java (included in the lab2_programs folder), to see how to do this.
- In the same file,
MyChecksSimple, define a new class, called CheckerBuggle
that extends the Buggle class.
- In
CheckerBuggle class define
a method which draws the same picture as the
program in ChecksSimple.java does.
Important: You may
NOT use the setPosition() method!
Note that since the
CheckerBuggle class is an extension of the Buggle class, you can use all
methods of the Buggle class.
Here are some pieces of advice to consider as you are writing your code:
- In the class
CheckerBuggle
write the header of the method that will draw the picture (is it
public or private? Is it void or does it return any value?). Think of
a good name for the method. Put the opening and closing braces { and
} for the body of the method. Do not yet write the code for the body of the method.
- In the file
MyChecksSimple.java, create an instance of
CheckerBuggle in the method run().
Invoke the new
method (the one that you are writing) on this instance of CheckerBuggle.
Compile and run the program.
Since there is nothing in the body of the method yet, you should only see
the new buggle on the applet, but no drawing.
- Go back, to fill in the body
of the method. As you are writing the code, compile and run your
program after adding every 1-2 lines. This way you can discover and
correct any errors immediately.
- The very first line of code in your method (note: in your method, not in your program)
should look like this:
System.out.println("Just inside blahblah method");
where blahblah is the name of your newly created method.
This allows your Java program to leave a trace, a trail of crumbs, so to speak.
Each time that line of code is executed, the words between the
double quotes will print to the console pane (lower pane in DrJava).
As your programs get more complex, these print statements will come in very handy.
Task 2 -- Drawing a checkerboard using
Methods
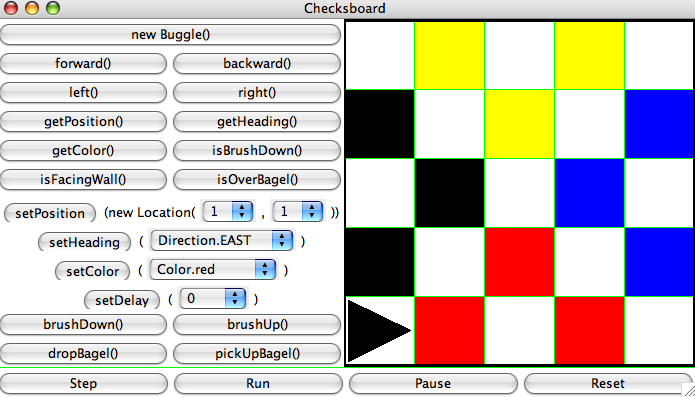
In this task, you will write a program to draw the next picture.
You will define methods to accomplish smaller tasks, and then put them together to get the whole picture.
Create a new file called Checksboard.java.
As you see in the picture, you need a 5x5 grid. Set this up.
If you need, take a look at MyChecksSimple.java, to see how to do this. (As a matter of fact, it is a good
idea to start this new file by copying an older one, like the MyChecksSimple.java, from the
previous task.)
In the file Checksboard.java copy the definition of the class CheckerBuggle
from ChecksWorld.java.
Then, in the run() method of Checksboard.java,
create an instance of a CheckerBuggle and invoke (call) its method(s) appropriately,
to draw the whole picture.
Your aim here, and in every program you are writing, is to make your run() method short, and easy to understand!
For this, your run() method should mainly contain method invokations,
and of course, a statement to create an instance of a CheckerBuggle.
In the end of the program the buggle must be positioned as shown below. However, it may have any color
(not black, as on the picture).
Task 3 -- Drawing a more complex checkerboard
(using more Methods...).
Create a new file called
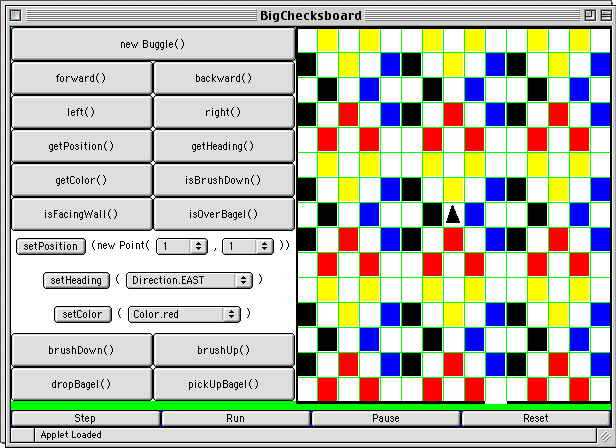
BigChecksboard.java, with a 15x15 grid in BuggleWorld
and a
CheckerBuggle class.
Write BigChecksboard.java to solve the problem:
Task 4 -- And even bigger and fancier checkerboard
(using more Methods...).
Create a new file called
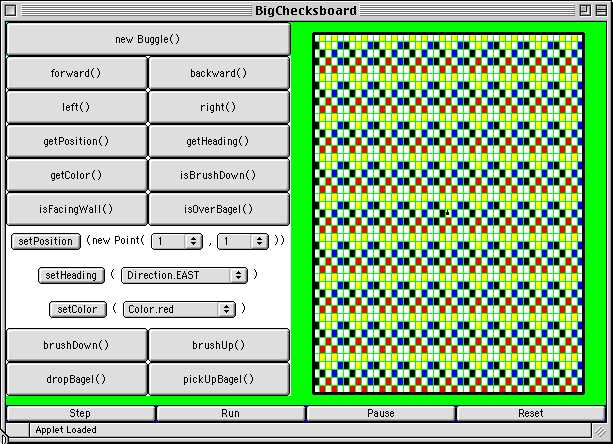
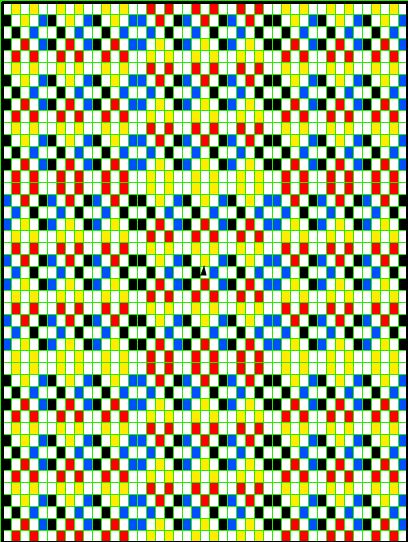
SuperBigChecksboard.java, with a 45x45 grid in BuggleWorld and a CheckerBuggle class.
SuperBigChecksboard.java should create this picture:
Task 5
Create a new file called
FlippedSuperBigChecksboard.java with a 45x45 grid to solve this problem:
|
