
Graphic by Keith Ohlfs |
Problem Set 10 Part I is due on Tuesday, December 4, at 11pmPart II is due on Tuesday, December 11, at 11pm |
|
Graphic by Keith Ohlfs |
Problem Set 10 Part I is due on Tuesday, December 4, at 11pmPart II is due on Tuesday, December 11, at 11pm |
[CS111 Home Page] [Syllabus] [Assignments] [Documentation] [FAQ] [CS Dept.] [CWIS]
ps10_programs
to your drop folder on the cs111 server.
Moire with the project that you have
created into the folder ps10_programs.
ps10_programs folder from the CS111 download folder. In the
Fishtank folder, look at Fishtank.java file. Notice the stubs for the
two class definitions: Fishtank and Fish. The Fishtank class already has
the stub of the paint() method that we will use for manipulating fish objects.
Our first task is to write code for the Fish class that will produce a
fish object in response to the following statement in the paint method:
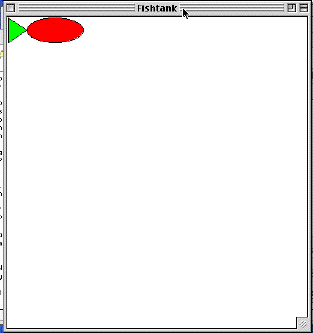
Fish freddy = new Fish(g);The Fish object will be drawn as follows:
In order to accomplish this, we must complete 3 steps:
| int length | The length of the entire fish |
| Point position | The position of the upper left corner |
| Color fishClr | The Color of the fish body |
| Color tailClr | The Color of the fish tail |
| Graphics gfx | The graphics object for drawing to the applet window |
Define these variables at the top of the Fish class. Make them private variables. Do not assign any values to them. Thus, the variable declaration for the position variable will be as follows:
private Point position;
| length | 100 |
| position | (1,1) (note that this is a point object) |
| fishClr | Color.red |
| tailClr | Color.green |
| gfx | g (the parameter given in the method invocation) |
To make these assignments, recall that we refer to the instance variables within the class using the keyword "this". Thus, we can set the value of the "postion" variable as follows:
this.position = new Point(1,1);To draw correctly to the applet window, the fish object needs to have access to the Graphics object from the paint method. The easiest way to do this is to use a parameter in the constructor method (this is the "Graphics g" parameter in the method definition). The fish object can keep track of this object by assigning its value to the "gfx" instance variable, as follows:
this.gfx = g;Fill in the other assignments for the length and colors of the fish.
When we create an instance of the fish class, we would like to have it drawn in the applet window. We can do this by invoking the "drawFish()" method from within the constructor method.
this.drawFish();Make sure you put this statement after the statements initializing the instance variables! (This doesn't do anything yet, we have to write the method first).
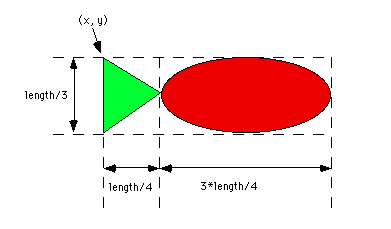
In the above diagram, x and y refer to the x and y components of the "position" variable. They indicate the upper left hand corner of the bounding rectangle for the fish. They can be accessed in your class definition by the expressions "position.x" and "position.y". The red body should be colored in the color specified by the instance variable fishClr and the green tail should be colored according to the instance variable tailClr.
Use the java graphics methods: drawOval, fillOval, Polygon(), fillPolygon, and drawPolygon to draw the fish above. When you are finished, you should be able to include the statement:
Fish freddy = new Fish(g);in your paint method and have the fish appear in the applet window.
                public void setFishClr(Color c)
                Set the body color of the fish to c.  Redraw the fish with
                the new color.

                public void setTailColor(Color c)
                Set the tail color of the fish to c.  Redraw the fish with
                the new color.

                public void setPosition(Point p)
                Clear the current fish drawing and set the new fish position
                to be the point p.  Redraw the fish at point p.

                public void resize(int size)
                Clear the current fish drawing and set the length of the fish
                to size (note that this is specified in number of pixels).
                Redraw the fish in the new size.

                public void clearFish()
                Clear the fish from the screen.
In each method you must assign a new value to the appropriate instance variable and then redraw the Fish. In the setPosition and resize methods you must clear the old fish from the screen before you change the values of the instance variables. To clear the fish, you should write the instance method "clearFish()". clearFish() clears the fish by drawing over the current fish in the color white. For the purposes of this assignment, you can make the clearFish() method nearly identical to the drawFish() method except for the changes in the drawing colors. As you write each instance method, test it out by invoking it from the paint method in the fishtank class. For example, you can test the setPostion method by invoking:
freddy.setPosition(new Point(100,200));
| Fish | fishClr | tailClr | position | length |
| freddy | default | default | (50,100) | default |
| felicia | green | yellow | (100,200) | 50 |
| frances | cyan | magenta | (175,150) | 25 |
| frank | blue | red | (225,125) | default |
| franny | magenta | cyan | (75,250) | 200 |
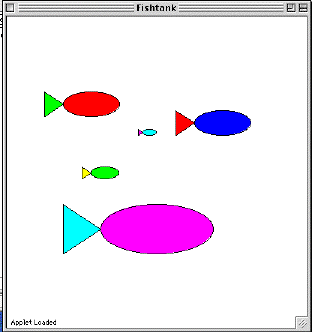
If you have completed the assignment correctly, your applet should look like the first figure above.
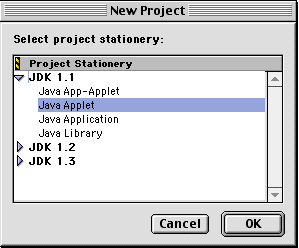
.mcp. Then click OK.
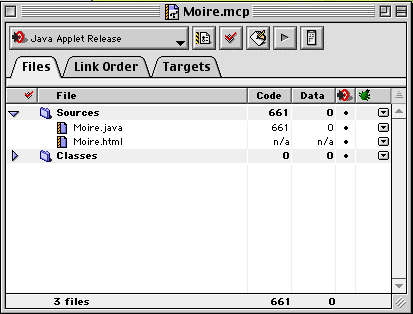
TrivialApplet.html,
TrivialAppletDebug.html, and TrivialApplet.java. Remove these files from
your project by dragging them from the project window to the trash. Note that deleting these files
from the project does not automatically delete them from the project folder. If you want to delete
them from the folder, double-click on the folder to open it, and then drag the files into the trash.
New Text File from the File menu. A new untitled
file will open.
You need to create two files: the HTML file that specifies which class to run and the JAVA file.
Your HTML file can have any name and (for this project) it will look like this:
<TITLE> Moire Patterns Applet </TITLE>

<applet codebase = "Java Classes" code = "Moire.class" width = 400, height = 400>
</applet>
.html.
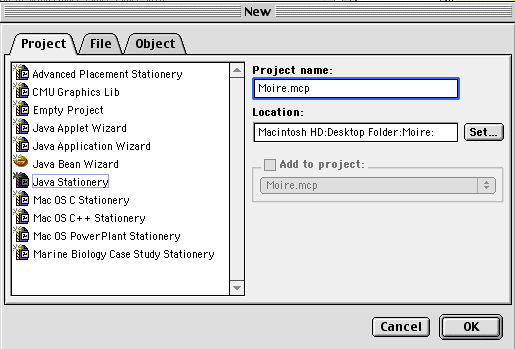
Moire.java and save it in the
project folder. The name of this file must be the same as the name of the class
that it defines (only with the .java extension), and in our case the class
is Moire.class, as specified in the HTML
file above.
Moire.java into the project window in the folder Sources. A window
will pop up asking you to confirm that you are adding the files to the project's targets.
Moire.java file.
Happy programming!
Now, when you have created your project, here is the problem that you are going to solve:
java.awt.* and java.applet.Applet. Add the following
code to the method paint and test the program:
    int width = 400;
    int height = 400;
    g.drawOval (0, 0, width, height);
(x,y) is point at the upper left
corner of the figure, and height and width are the
height and width of the figure (this is a standard format of graphics method).
public static void moire (Graphics g, int x, int y, int width, int
height) {
    int i = 1;
    while (i<width) {
        g.drawOval (x, y, x + i, y + i);
        i = i + 2;
    }
}
Moire class
and replace the invocation of
drawOval() in paint() by a single line
that invokes moire.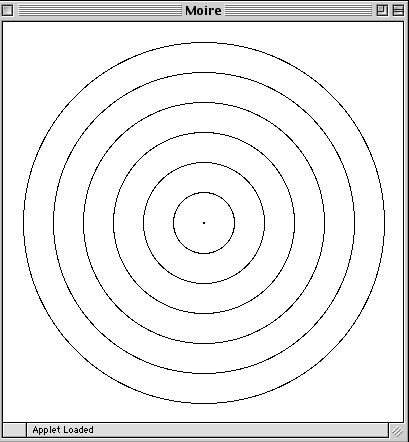
radial that draws a set of line segments as shown in the
figure below.
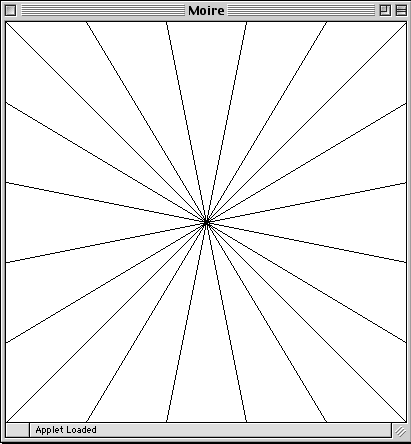
paint()
by invocation of radial().
radial() to work, adjust the spacing between lines to create a Moiré
pattern.