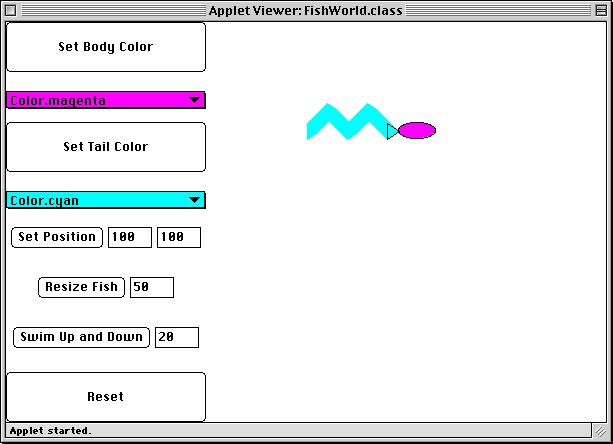
Remember the Fish from PS9? Well, after you turned in your problem set, they banded together and taught themselves how to swim across Lake Waban! So, today, you'll create a control for each of the Fish's instance methods. For example, you will make a button called "Set Body Color" and a pull-down menu (a Choice menu) to select a color, which will change the Fish's body color to whatever color you have selected. At the end you will have a control panel to the left of the area where the fish will be.
First things first! Download the lab11_programs
folder from the CS111 download directory. Start
filling the first set of methods, and
then bring the project up to date. The project will not compile
successfully until you have filled in these methods. (You can check
out a working applet in
lab11_programs/Test/Fishworld.html)
Because we want to have more than just the Fishtank in our applet
window, the Fish will be drawn in an area of the applet window set
apart by a Canvas. Canvas, like Applet, is a pre-defined class in
Java which you can extend as you like. We will call our Canvas
fishtank. In PS9, the only thing in our applet window
was the fishtank, so we just drew things to the applet window. For
today's lab, we draw to the Canvas in order to keep the Fish in a
certain area of the applet window, so that you will be able to add
the control panel on the side.
Our overall applet window layout uses a BorderLayout, with the control panel in the West and the Canvas in the Center. Some methods we are using:
|
|
sets up the layout |
|
|
creates the control panel as described below |
|
|
creates the Canvas where the Fish will be drawn |
|
|
starts up the applet |
|
|
creates a new Fish (hand makeFish the Graphics context of
the Canvas and also set the FishWorld instance variable
|
First, specify your Layout for each Panel, and then place things
in it in the right order. This is done by calling a series of
make methods to create each Button or TextField to
achieve the look you desire.
The overall control panel uses a grid layout, with a row for each button, and all of them in a single column. You'll notice that some of the rows have multiple items in them (a button and a textfield, for instance). If you would like more than one item in a part of your grid, you need to create a panel to arrange them together first. So for the button and textfield example, you would need to create a panel which has a button and a textfield in it, and then put the panel into your overall grid layout.
For example, this places a single button in the first part of your grid:
myControls.add (makeMyButton());
in your method that builds your control panel. This adds your
button to the control panel called MyControls by calling the method
makeMyButton to create the button.
The method makeMyButton() then creates the button,
puts the labelling text (the words which appear on the button) into
it, and returns the completed button. In fact, the method which makes
the control panel is itself one of these make methods:
it returns the completed control panel to the init()
method in your FishWorld class.
You should create your control panel for your FishWorld applet to look like the one shown above. Your Choice menus contain all the color choices for the body and tail of the Fish. You may include any of the usual colors that you want. The TextFields are all length 5.
Once you get things to look right, then you can begin to add functionality to each of your buttons. Your buttons should react as follows:
|
Button |
Action |
|
Set Body Color |
calls Fish method setBodyColor using the current
|
|
Set Tail Color |
calls Fish method setTailColor using the current
|
|
Set Position |
reads in the numbers entered in the two TextFields to create a new Point, and then uses the Fish method setPosition to put the Fish at the new Point |
|
Resize |
reads in the number entered in the TextField and hands it to the Fish method resize as the new Fish length |
|
Swim Up and Down |
reads in the number entered in the TextField and hands it to the Fish method swim as the amplitude of swim |
|
Reset |
paints over the Canvas with a white Rectangle and then
calls the |
Start by writing your action method. The action
method takes two parameters: an Event and an Object. It looks
something like this:
	public boolean action (Event event, Object arg) {
	}
In this method, each possible location for the event (a mouse click, in the cases with which we are concerned) is listed as a conditional, and the appropriate responding action is called. We need to define our conditionals to check if the event's target location was over each GUI element. For instance:
	if (event.target == myButton) {
		//do the right thing
	} else if (event.target == myNextButton) {
		//do the right thing
	}
and so on. The final else should call the following
line:
return super.action(event, arg);
so that if the action doesn't fit any of the ones we care about,
then it will be handed up to another level to be dealt with there.
Once all of the conditionals have been exhausted, we return true as
the last step in the action method. This confirms that
the event has been handled successfully, in the case that it was an
event that we care about.
In most cases, more than one thing needs to happen in response to
the Event. In these cases, the corresponding if clause
contains a single call to a method which handles the response. This
method contains all of the steps necessary to respond to the Event.
The idea here is to keep the main action method clean,
with each response only taking up a single line of code within this
method.
Note that, in this problem, there are a couple of cases in which we can respond directly to the event without needing to create a separate method to handle the response.
Some particulars about the Color Choice menus:
For the cases in which the event is over the color Choice menus,
the responding methods will need the Object arg from the
action method's parameters. This arg will
contain the value of the selection in the form of the String which is
displayed as the menu item. In particular, the String
"Color.blue" might be this value, if that is the
selected color. The responding method needs to check to see if
arg matches each of these Strings, and then set the
instance variable (selectedBodyColor or
selectedTailColor) to be the corresponding Color.
The responding method for this set of actions should also set the background color of the Choice menu to reflect the new selected color.
Some particulars about using the TextFields:
True to the name, TextFields are areas where text can be entered
by your user. The problem with this, in our case, is that we need
integers from the user. We assume that the user is intelligent and
will enter numbers into our TextFields, but we still need to convert
that text into Integers for the methods which need ints.
To do this, we use the Integer method
parseInt, which we used in some of our List problems
earlier this semester.
In this problem, we apply Integer.parseInt to the
result of getText(), a method of TextField. Thus, each
time we need an integer from a TextField, we use something like
this:
int myInt = Integer.parseInt(myTextField.getText());
Some particulars about the resetAction method:
The resetAction() method basically needs to clear the
Canvas so that the GUI can begin anew. We do this by first "erasing"
the Canvas by drawing a white rectangle over its entirety. For this,
we need the exact dimensions of our Canvas. Fortunately, a method
exists which gives us exactly this information.
We introduce a class called Dimension which contains
width and height. (You do not need to
define the Dimension class. It already exists.) The Canvas method
size() returns a Dimension object, from which we can
extract the exact dimensions of our Canvas. The syntax looks
like:
Dimension d = myCanvas.size();
We can then use d.width and d.height to
draw our white rectangle.
Remember that, in order to draw to the Canvas, we must have its Graphics context. We can get the Graphics context by using:
Graphics myContext = myCanvas.getGraphics();
With the Canvas "erased", we can then call the
start() method to restart the applet from its
beginning.
Once you are done, your default Fish will react to the swim button like this:
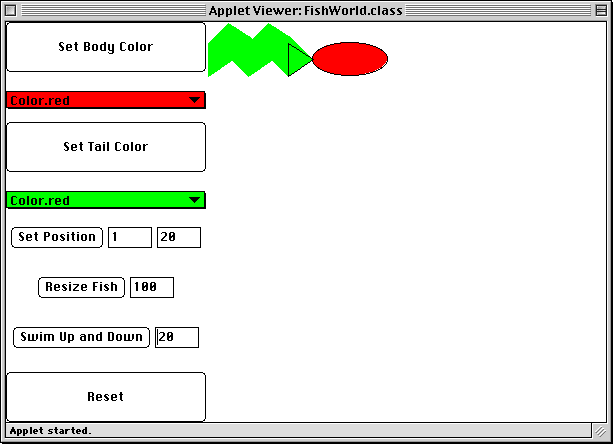
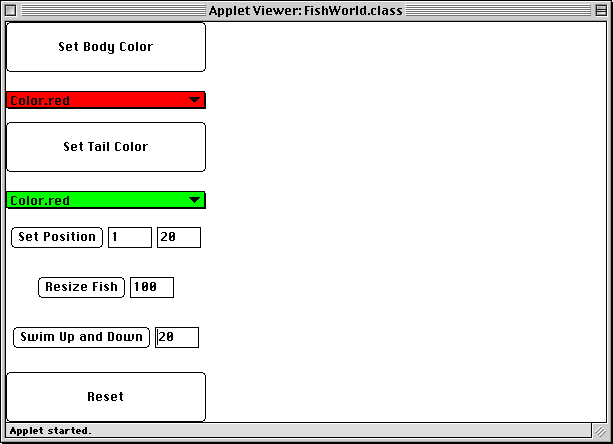
This is what the applet window looks like after you've changed all the values to the ones shown (and clicked on the corresponding buttons to get it to actually change), and then clicked the swim button.