
Graphic
by Keith Ohlfs
|
CS111, Wellesley College, Fall 2000
Problem Set 9
Due: Tuesday, December 5 by 3:30 p.m.
|
[CS111 Home Page] [Syllabus]
[Students] [Lecture
Notes] [Assignments] [Programs]
[Documentation] [Software
Installation] [FAQ] [CS
Dept.] [CWIS]
How to turn in this Problem Set
Parts IA and IB. Save the modified DatabaseArrays.java
file (formerly named DatabaseDouble.java) and the modified DatabaseVectors.java
file in the Database programs folder. Upload
the entire folder to your ps9 drop folder. Turn in hardcopies of the DatabaseArrays.java
and DatabaseVectors.java files.
Part II. Save the modified Fishtank.java file in the fishtank
folder. Upload the entire folder to your ps9 drop folder. Turn in a hardcopy
of the Fishtank.java file.
Turn in only one package of hardcopy materials. Staple your files together
with the cover page, and submit your hardcopy
package to Jennifer, Sergio, Sohie or Rita during one of the following
times only:
-
Jennifer: Monday 12:30-1:30 pm (Sci E104)
-
Sergio: Monday 3-5 pm (Sci E212)
-
Sohie: Tuesday 10-12 am (Sci 402)
-
Rita: Tuesday 1:30-3:30 pm (just place your package in the box marked CS111
on the floor in front of Rita Purcell's desk in the Science Center focus
area)
Reminders
-
Be sure to doublecheck that the your folder and files were actually uploaded.
-
Keep a personal back-up of every file that you upload.
-
If you have trouble uploading files, it may be because you have reached
the limits of your Nike file system quota. In this case, you need to delete
some of your old files, either from your home directory or your drop folders
(which are also counted toward your quota). To delete a file in Fetch,
just drag it to the Trash.
Homework Problem Part I: The Day-to-Day Database Crisis!
Now that you have mastered the basic elements of Java programming, you
have decided to do some work as a programming consultant to earn a little
extra holiday spending money. You answer an ad from the Day-To-Day temporary
employment agency concerning some troubles they are having with their employee
database. The human resources department of Day-To-Day uses a simple database
program (described below) that maintains the name and email address of
each active temporary employee. Unfortunately, the creators of this database
program only tested the program on small test databases and did not worry
about how long certain operations would take on large databases. In particular,
it turns out that the database program is rather inefficient at adding
each new person, so that large databases can take a very long time to create.
Your job is to rewrite a portion of the database code in a more efficient
form so that large databases will be created more quickly. Because the
company does not want to have to retrain its human resource staff to work
with a new database program, they have asked you to modify the existing
program so that it has the same behavior from the user's perspective, except
that certain operations should be faster.
The Features of the Database Program
The database program used by Day-To-Day can be found in the Database programs
folder in the ps9_programs download folder. Run the applet DatabaseWorld.html
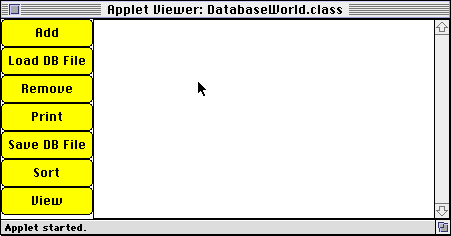
within this folder using the appletview. You will see that the program
consists of a window with several buttons at the left as shown below:
If you press the Load DB File button, you will be prompted to
select a database file using the usual Macintosh file dialog mechanism.
All files ending in the extension .db are database files. The Database
folder contains three such files: test4.db,
test6.db,
and test10.db. If you select test6.db,
the database window will be updated to show the six personnel entries in
this file, as shown below:
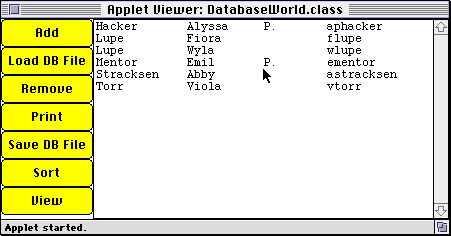
Each personnel entry has four fields: a last name, a first name, a middle
name or initial (which may be empty), and an email name. An entry may be
selected by clicking on it. At most one entry can be selected at any one
time.
The other buttons manipulate the entries as described below.
-
Add: This button allows the user to add a single person to the data
base. When pressed, a window appears with text fields for First name, Middle
name, Last name and Email address, to be filled in by the user.
-
Remove: This button removes the selected entry from the database.
-
Print: This button displays the current database in the stdout
window.
-
Save DB file: This button saves the current database in a user-specified
file. Because of applet security restrictions, this button only works when
the program is launched as an application, and not as an applet. (To launch
the program as an application, double click on the DatabaseWorldApplication.class
icon in the Database programs folder.)
-
Sort: This allows the user to sort the entries in the database alphabetically
by a given field. When pressed, the user is prompted to sort by First name,
Middle name, Last name, or Email address.
-
View: This allows the user to look at the information for a single
entry in the database. (In the current version of the database, this option
is unimplemented. It may be implemented in the future.)
You should play around with the applet to get a feel for these operations
before attempting the rest of this problem.
The Database Class Interface
The database program is rather large. Fortunately, due to the wonders of
data abstraction, it turns out that you only have to understand the Database
class defined in the source code file Database.java.
Instances of the Database class maintain an
ordered collection of Person objects, each
of which represents one entry in the database. The Database
class is in some sense the heart of the database program --- all of the
other classes in the program provide support for interacting with
Database
objects or the Person objects that they hold.
The Database class has the following interface:
Constructor:
public Database()
   Create an empty database (one that contains no persons).
Instance Methods:
public int size()
   Return the number of persons in the database.

public void clear()
   Make this database empty.

public void add(Person p)
   Add person p to the end of this database.

public void remove(String s)
   Remove the person with description string s from this database.
    If no person in the database has description string s, do nothing.
    (The description string of a Person object is the entry string that
    appears in the database window. This string is produced by the
   String toString() method of the Person class. The
   boolean hasString (String s) method on the Person
    class is used to test if a person has a given description string.)

public void sort (Comparator comp)
   Sort the entries of the database according to the comp object. A
   Comparator object specifies the ordering of two Person objects via a
   boolean lessThan (Person p1, Person p2) method.

public void print()
   Display the entries of the database in the stdout window.

public void print(PrintStream ps)
   Write the entries of the database to the print stream ps.
    This method is used to save databases to a file.

public String [ ] entryList()
   Return an array of description strings for the entries of the database.
    The description strings have the same order as the database entries.
The Database Class Implementation
There are zillions of ways to implement the Database class interface presented
above. The implementation in the file
Database.java
represents a database with
n entries as an array (named people)
of n Person objects. You should study
the code in Database.java to see how each of
the above constructors and methods is implemented in terms of this representation.
In particular, pay attention to the implementation of the add
and
remove methods. The add
method adds a person p to the end of a database as follows:
-
Suppose the current database contains n entries.
-
Create a new array (newPeople) that has length
equal to n+1.
-
Copy the elements of people[0..n-1] into newPeople[0..n-1].
-
Store p into the last slot of newPeople.
-
Replace the old array by the new array.
The remove method removes the person with description
string s as follows:
-
Suppose the current database contains n entries.
-
Determine the index i at which the person with description string s resides.
-
Create a new array (newPeople) that has length
equal to n-1.
-
Copy the elements of people[0..i-1] into newPeople[0..i-1].
-
Copy the elements of people[i+1..n-1] into newPeople[i..n-2].
-
Replace the old array by the new array.
These operations do a lot of copying work every time an entry is added
to or removed from the database. It turns out that loading a database with
n entries from a file calls the add method n times. Because of all the
copying involved, it can take a long time to load in a large database.
We will see in CS230 that the loading process takes time quadratic in the
size of the database --- i.e., it is proportional to the square
of the size of the database. This is bad; we would like it to take time
linear in the size of the database --- i.e., it should take time proportional
to the size of the database.
The purpose of part A of this problem is to explore an alternative representation
of databases that makes add and remove more efficient. Part B explores
the use of Vectors as the basis for yet another implementation, one that
is rather convenient from the programmer's point of view.
Part A: An Alternative Database Representation Using Arrays
In this problem, you will implement an alternative database representation
that improves the efficiency of the add and remove methods. One way to
make the add method more efficient is to start with a database array that
is a certain small size (for example 4 elements), instead of zero elements.
You can then add entries without increasing the array size until you fill
that array. When you reach the limit for that array, you can then create
a new array that is double the size of the old array, and copy the old
array into the new one (much like the current version of the program does).
Thus, when you add the 5th person, you would:
-
Create a new array that is 8 elements long.
-
Copy the current array of 4 elements into the new array.
-
Add the 5th person to the new array.
-
Make the new array the current array.
You can then add people to your database without copying until you reach
the ninth person to be added, at which time you can double the size of
the array again. The strategy of doubling the size of the array rather
than incrementing the size of the array every time it is full significantly
reduces the number of copy operations that need to be performed in a sequence
of add invocations. In fact, the doubling strategy changes the quadratic
time load process into a linear time load process.
The remove method can be implemented as follows:
-
Suppose the current database contains n entries.
-
Determine the index i at which the person with description string s resides.
-
Shift the elements of people[i+1..n-1] leftward into the slots people[i..n-2].
Note that a remove invocation never changes the size of the array in this
strategy.
Note that the number of entries in this strategy is no longer equal
to the length of the people array. To keep
track of the database size, a database object must have an additional instance
variable (call it count) that counts the number
of entries in the database. The following invariant should be preserved
by all the database operations:
-
The slots people[0..count] should contain the Person objects representing
the entries of the database. The slots[count+1..people.length-1] have unspecified
contents -- they may be null, or may contain Person objects that will be
ignored by the database program
To begin this problem, you should follow these steps:
-
Download the Database programs folder to your local disk.
-
Open Database.proj.
-
Open Database.java by double clicking on the icon in the project window.
Rename the class and constructor from Database to DatabaseIncrement. Save
the file away as DatabaseIncrement.java.
-
Open DatabaseDouble.java by double clicking on the icon in the project
window. Rename the class and constructor from DatabaseDouble to Database.
Save the file away as Database.java.
The file initially named DatabaseDouble is a skeleton for the alternative
database representation. The above steps are necessary for replacing the
original Database implementation by the alternative Database representation.
Note that the original version is still available in DatabaseIncrement.java
-- you may wish to refer to this file as you flesh out the skeleton. If
you wish to install the original version again, you will have to undo steps
3 and 4.
For this problem, you will only need to accomplish the following tasks:
-
Implement the Database() constructor. The initial people array should have
length 4.
-
Implement the size() method. You can test this method using the Print
button, which prints out the size of the database along with the entries.
-
Implement the clear() method. This should not change the size of
the people array.
-
Implement the add(Person p) method as outlined above. This should double
the size of the people array only when the
array is full of valid entries. You may wish to insert a call to System.out.println
that indicates every time the array size is doubled. You can test this
method via the Add button. You can also test add(Person p) and clear()
together using the Load DB File button. This clears the database
and adds the entries from the file one by one. You should try loading all
the provided .db files.
-
Implement the remove() method as sketched above. This method should not
change the size of the people array. You can test this method via the Remove
button.
-
It is not necessary to modify any other methods other than the ones mentioned
above. As part of your problem set, you should include a brief explanation
why
it is not necessary to modify any of the other methods.
Note: On the small databases provided, you will not be able to observe
a noticeable speedup with the new implementation. If time permits, we will
try to provide a larger file that makes the speedup clear.
Part B: Alternative Database Representation Using Vectors
In this problem you will develop a different implementation of the Database
class using a Vector instead of an array to store the entries of the Database.
The Vector version has certain advantages to the implementer (you) when
compared to the array version, in the sense that the various methods of
the Database class can be implemented more easily in the Vector version.
For example, you don't need to explicitly increase the size of the storage
structure when adding new entries, as the insertion methods of the Vector
class do this for you. Also, it isn't necessary to have a separate instance
variable that keeps track of the current size of the storage structure.
To begin this problem, we recommend that you first complete the array
version as required in Part A above.
Save the array version of Database.java underthe name DatabaseArrays.java
before starting work on the Vector version. Otherwise you risklosing all
your work on the array version. You may then follow the steps outlined
above for the array version:
-
Download the Database programs folder to your local disk.
-
Open Database.proj.
-
Open Database.java by double clicking on the icon in the project window.
Rename the class and constructor from Database to DatabaseIncrement. Save
the file away as DatabaseIncrement.java.
-
Open DatabaseVectors.java by double clicking on the icon in the project
window. Rename the class and constructor from DatabaseVectors to Database.
Save the file away as Database.java.
The file initially named DatabaseVectors is a skeleton for the alternative
database representation using Vectors instead of arrays. The above steps
are necessary for replacing the original Database implementation by the
alternative Database representation. Note that the original version is
still available in DatabaseIncrement.java -- you may wish to refer to this
file as you flesh out the skeleton. If you wish to install the original
version again, you will have to undo steps 3 and 4. If you wish to base
your Vector version on your array version from part A, then just
use your modified DatabaseArrays.java file instead of the original Database.java
file when performing the above steps. However, you should in any case
use the outline for the Vector implementation that is being provided in
DatabaseVectors.java.
For this problem, you will only need to accomplish the following tasks:
-
Implement the Database() constructor.
-
Implement the size() method. You can test this method using the Print
button, which prints out the size of the database along with the entries.
-
Implement the clear() method. This method is allowed to change the
size of the people Vector. There is a convenient Vector method that you
can use to implement clear() but that does not appear in the Vector contract
discussed in lecture. To find this additional method, consult the Vector
class documentation as described below. However, feel free to provide a
different implementation of clear() if you prefer.
-
Implement the add(Person p) method. You can test this method via the Add
button. You can also test add(Person p) and clear() together using the
Load
DB File button. This clears the database and adds the entries from
the file one by one. You should try loading all the provided .db files.
-
Implement the remove() method as sketched above. This method is
allowed to change the size of the people Vector. You can test this method
via the
Remove button.
For some or all of the above tasks, you may find it convenient to refer
to the Java API documentation for the Vector class. Follow the documentation
link on the CS111 homepage, scroll down to "Java resources", go to "Java
library documentation", then to the java.util package documentation, and
follow the link for the Vector class.
Part II. Building your own objects
Building a Class: The Fish class
In lecture we discussed how to create a simple class definition, using
instance variables, a constructor method definition and instance method
definitions. The instance variables keep track of the state of each instance
of the class, the constructor method initializes the state of each instance
as it is created, and instance method declarations define methods that
instances of the class can carry out. We also discussed using the graphics
methods from the Java abstract windows toolkit library. Today you will
combine these to build your own Fish class. You will write a program that
has two classes. The Fishtank class contains the code that will create
fish objects and invoke fish methods to change their color, size and position.
The Fish class definition will define fish objects according to their instance
variables, constructor method and instance methods. In the end you will
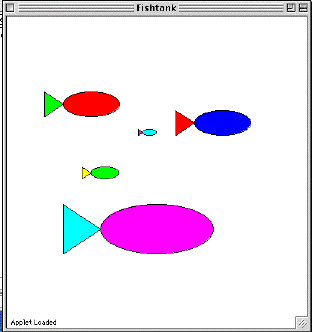
have an applet that looks like this:
Getting Started: Defining a generic fish object
Download the ps9_programs folder from the CS111 download folder. In the
"fishtank" folder, look at Fishtank.java file. Notice the stubs for the
two class definitions: Fishtank and Fish. The Fishtank class already has
the stub of the paint() method that we will use for manipulating fish objects.
Our first task is to write code for the Fish class that will produce a
fish object in response to the following statement in the paint method:
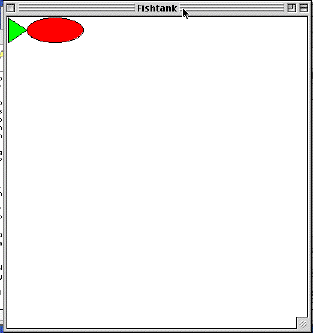
Fish freddy = new Fish(g);
The Fish object will be drawn as follows:
In order to accomplish this, we must complete 3 steps:
-
Define the instance variables
-
Define the constructor method
-
Write an instance method to draw the fish.
Defining the instance variables
You should make your fish object so that a fish is defined by the following
variables:
| int length |
The length of the entire fish |
| Point position |
The position of the upper left corner |
| Color fishClr |
The Color of the fish body |
| Color tailClr |
The Color of the fish tail |
| Graphics gfx |
The graphics object for drawing to the applet window |
Define these variables at the top of the Fish class. Make them private
variables. Do not assign any values to them. Thus, the variable declaration
for the position variable will be as follows:
private Point position;
Defining the Constructor method
The constructor method should initialize the instance variables to default
values when a fish object is created. You should write code in the constructor
method to set the following defaults for the Fish objects:
| length |
100 |
| position |
(1,1) (note that this is a point object) |
| fishClr |
Color.red |
| tailClr |
Color.green |
| gfx |
g (the parameter given in the method invocation) |
To make these assignments, recall that we refer to the instance variables
within the class using the keyword "this". Thus, we can set the value of
the "postion" variable as follows:
this.position = new Point(1,1);
To draw correctly to the applet window, the fish object needs to have access
to the Graphics object from the paint method. The easiest way to do this
is to use a parameter in the constructor method (this is the "Graphics
g" parameter in the method definition). The fish object can keep track
of this object by assigning its value to the "gfx" instance variable, as
follows:
this.gfx = g;
Fill in the other assignments for the length and colors of the fish.
When we create an instance of the fish class, we would like to have
it drawn in the applet window. We can do this by invoking the "drawFish()"
method from within the constructor method.
this.drawFish();
Make sure you put this statement after the statements initializing
the instance variables! (This doesn't do anything yet, we have to write
the method first).
Writing the drawFish() method
Now you are ready to write the drawFish method. This method should draw
a fish according to the following format:
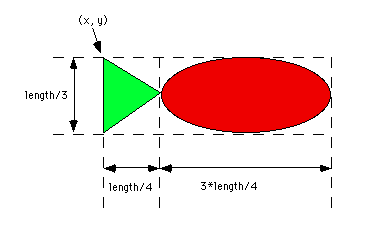
In the above diagram, x and y refer to the x and y components of the
"position" variable. They indicate the upper left hand corner of the bounding
rectangle for the fish. They can be accessed in your class definition by
the expressions "position.x" and "position.y". The red body should be colored
in the color specified by the instance variable fishClr and the green tail
should be colored according to the instance variable tailClr.
Use the java graphics methods: drawOval, fillOval, Polygon(), fillPolygon,
and drawPolygon to draw the fish above. When you are finished, you should
be able to include the statement:
Fish freddy = new Fish(g);
in your paint method and have the fish appear in the applet window.
Instance Methods for the Fish Class
Now you are ready to write some methods that your fish can understand.
You will write methods that set the body color, the tail color, the position
of the fish, and the length of the fish. The methods names are as follows:
                public void setFishClr(Color c)
                Set the body color of the fish to c.  Redraw the fish with
                the new color.

                public void setTailColor(Color c)
                Set the tail color of the fish to c.  Redraw the fish with
                the new color.

                public void setPosition(Point p)
                Clear the current fish drawing and set the new fish position
                to be the point p.  Redraw the fish at point p.

                public void resize(int size)
                Clear the current fish drawing and set the length of the fish
                to size (note that this is specified in number of pixels).
                Redraw the fish in the new size.

                public void clearFish()
                Clear the fish from the screen.
In each method you must assign a new value to the appropriate instance
variable and then redraw the Fish. In the setPosition and resize methods
you must clear the old fish from the screen before you change the values
of the instance variables. To clear the fish, you should write the instance
method "clearFish()". clearFish() clears the fish by drawing over the current
fish in the color white. For the purposes of this assignment, you can make
the clearFish() method nearly identical to the drawFish() method except
for the changes in the drawing colors. As you write each instance method,
test it out by invoking it from the paint method in the fishtank class.
For example, you can test the setPostion method by invoking:
freddy.setPosition(new Point(100,200));
Creating Multiple Fish
You can now create multiple fish and change their characteristics from
the paint() method in your fishtank class. Inside the paint method create
5 fish: freddy, felicia, frances, frank and franny. Use the Fish instance
methods to change the state of these fish as follows:
| Fish |
fishClr |
tailClr |
position |
length |
| freddy |
default |
default |
(50,100) |
default |
| felicia |
green |
yellow |
(100,200) |
50 |
| frances |
cyan |
magenta |
(175,150) |
25 |
| frank |
blue |
red |
(225,125) |
default |
| franny |
magenta |
cyan |
(75,250) |
200 |
If you have completed the assignment correctly, your applet should look
like the first figure in this assignment.

